VW Golf manuals

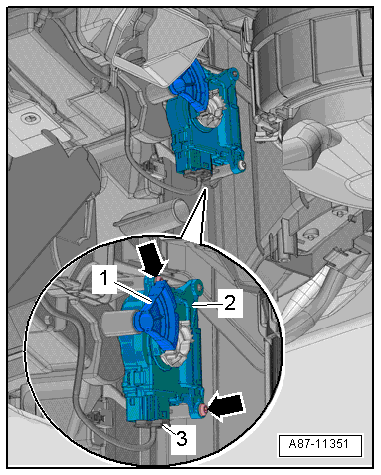
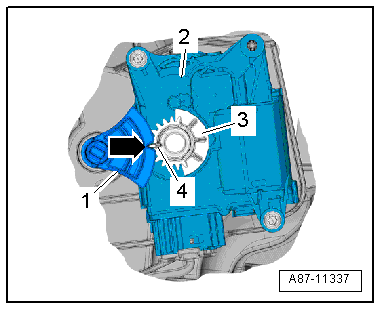
Volkswagen Golf Service & Repair Manual: Removing and installing right temperature flap control motor -V159-, LHD vehicles

Volkswagen Golf Service & Repair Manual / Heating, air conditioning / Air conditioner / Control motors / Removing and installing right temperature flap control motor -V159-, LHD vehicles

Special tools and workshop equipment required
Vehicle diagnostic tester
First carry out the following work:
–  Switch off all electrical consumers.
–  Switch off ignition.
–  Remove ignition key.
Removing
–  Remove baffle plate → Chapter.
   
–  Pull off actuating lever -1- for temperature flap.
–  Unscrew bolts -arrows-.
–  Remove right temperature flap control motor -V159--2-.
–  Disconnect electrical connector -3-.
 

Removing and installing right temperature flap control motor -V159-, LHD vehicles

Installing
Installation is carried out in the reverse order. When installing, note the following:
  Note
Check operation of flaps and hinge mechanism before fitting.
Make sure levers and shafts are properly fitted in the mounts.
–  Fit control motor -1- on air distribution housing. Gear wheel -2- on control motor must engage in gear wheel -3- on temperature flap lever.
The long tooth -4- must engage in recess -arrow- on actuating lever.
  Note
If the gear wheels on the control motor and temperature flap lever do not align, rotate the receptacle in the control motor.
If the bolts cannot be fitted, the control motor is not completely seated on the housing.
–  Switch on ignition, connect respective control motor to vehicle wiring harness and select a setting on operating and display unit to set control motor to desired position (e.g. mid-position). Wait until control motor has moved to desired position and switch off ignition.
–  Route wiring harness so that it cannot come into contact with any moving parts (e.g. actuating arm on control motor).
  Note
Turn the control motor until it reaches a convenient position for installation. The direction of rotation can be changed by changing polarities.
–  Read event memory, and clear any entries displayed. Then, perform “basic setting”vehicle diagnostic tester in “Guided fault finding” mode.
–  As a final step, check operation of heater and air conditioning system.
Specified torque
→ Chapter „Assembly overview - heater and air conditioning unit“
 

Removing and installing right temperature flap control motor -V159-, LHD vehicles

Removing and installing left temperature flap control motor -V158-, RHD vehicles
Special tools and workshop equipment required Vehicle diagnostic tester First carry out the following work: ...

Removing and installing right temperature flap control motor -V159-, RHD vehicles
Special tools and workshop equipment required Vehicle diagnostic tester Bit ratchet First c ...

Other materials:

Variable luggage compartment floor
Fig. 103 In the luggage compartment: lifting the variable luggage compartment floor Fig. 104 In the luggage compartment: variable luggage compartment floor folded up First read and observe the introductory information and safety warnings The variable luggage compartment floor is height-a ...

Removing and installing bracket for parking aid control unit -J446-/park assist steering control unit -J791-, LHD vehicles
Special tools and workshop equipment required Feeler gauge Removing –  If fitted, remove parking aid control unit/park assist steering control unit → Chapter. ...

Low Voltage Power Socket
Your Model X has a power socket located in the center console's rear compartment. To access the low voltage socket, open the front compartment of the center console. The power socket is suitable for accessories requiring up to 12A continuous draw (16A peak). NOTE: Power is available whenever th ...

© 2016-2023 Copyright www.vwgolf.org