Volkswagen Golf Service & Repair Manual: Removing and installing refrigerant line between condenser and air
conditioner compressor
| Special tools and workshop equipment
required |
|
|
|
| |
|
|
| Torque wrench -V.A.G 1331/- (5…50 Nm) |
| Air conditioner service station |
| – |
Observe safety precautions
→ Chapter „Safety precautions when handling refrigerants“. |
| – |
Comply with notes
→ Chapter „Working on refrigerant circuit“. |
| – |
Extract refrigerant using air conditioner service station
before opening refrigerant circuit. |
| Depending on the engine, parts of the air filter must be
removed
→ Rep. gr.24 or
→ Rep. gr.23. |
| Depending on the engine, parts of the air duct must be
removed
→ Rep. gr.24 or
→ Rep. gr.23. |
| Depending on engine, parts of the charge air system must be
removed
→ Rep. gr.21. |
| – |
Remove front bumper cover
→ General body repairs, exterior; Rep. gr.63. |
| – |
Remove noise insulation
→ General body repairs, exterior; Rep. gr.66. |
Risk of freezing injury caused by escaping pressurised refrigerant.There
is a risk of injury to the skin and parts of the body due to
freezing.Always wear safety gloves.Always wear safety goggles.Extract
refrigerant, and open the refrigerant circuit immediately afterwards.If
more than 10 minutes passed since the refrigerant has been extracted, do
not open the refrigerant circuit prior to extracting refrigerant anew.
Due to re-evaporation, pressure will be built up in the refrigerant
circuit. |
|
|
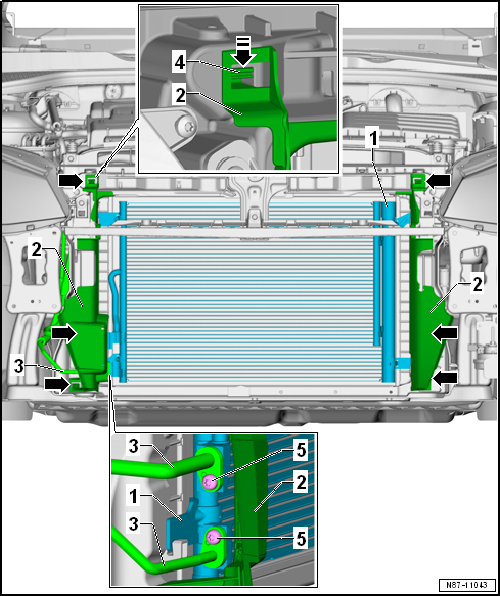
| – |
Unscrew bolt -5- of upper
refrigerant line -3-. |
| – |
Remove refrigerant line -3-
from condenser -1-. |
|
|
|
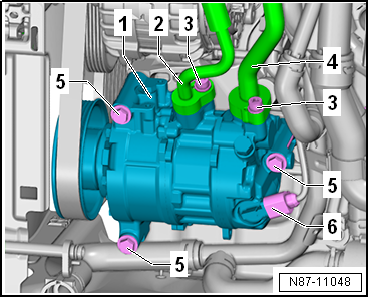
| – |
Unscrew bolt -3- of refrigerant
line -2-. |
| – |
Remove refrigerant line. |
| Installation is carried out in the reverse order. When
installing, note the following: |
| – |
Renew seals. For versions, refer to
→ Electronic Parts Catalogue. |
| – |
Moisten seals with refrigerant oil before installing
→ Chapter. |
 Note Note
| Ensure proper seating of seals in the groove of the
respective refrigerant line. |
| → Chapter „System overview - refrigerant circuit“ |
| → Chapter „Assembly overview - drive unit of air conditioner
compressor“ |
| Noise insulation
→ General body repairs, exterior; Rep. gr.66 |
| Front bumper cover
→ General body repairs, exterior; Rep. gr.63 |
|
|
|
Special tools and workshop equipment
required
Engine bung set -VAS 6122
...
Special tools and workshop equipment
required
...
Other materials:
Removing and installing connecting Bowden cable
Removing
–
Remove backrest cover and backrest padding
→ Chapter.
–
Swing mounting bracket for backrest release mechanism
-1- upwards as far as ...
Removing and installing bracket for net partition
Removing
–
Remove luggage compartment side trim
→ Chapter.
–
Pull belt webbing aside, and unscrew bolts
-2-.
–
Pull bracket for net partition -1- ...
Continuation of checking pressures
Where vehicles have a restrictor and reservoir, check these
(with internally regulated air conditioning system compressor)
→ Chapter.
Where vehicles have an expansion valve and receiver, check
these (with internally regul ...
© 2016-2026 Copyright www.vwgolf.org

 Removing and installing refrigerant line between condenser and evaporator
 Removing and installing refrigerant line between air conditioner compressor
and evaporator
Removing and installing refrigerant line between air conditioner compressor
and evaporator