Volkswagen Golf Service & Repair Manual: Removing and installing rear window regulator switch in door -E52-/-E54-
 Note Note
| Removal and installation are described for the left side.
Removal and installation on the right side are carried out in
the same way (mirror image of left side). |
| – |
Remove rear door trim
→ General body repairs, interior; Rep. gr.70. |
|
|
|
| – |
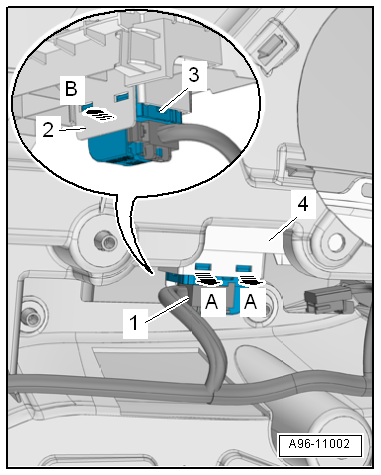
Using a small screwdriver, release locking devices in
direction of arrow -A-. |
| – |
Release retaining tab -2- in
direction of arrow -B-. |
| – |
Take window regulator switch -3-
out of switch mounting and remove towards rear. |
| – |
Disconnect electrical connector -1-. |
| Installation is carried out in the reverse sequence. |
|
|
|
| Removing and installing rear door contact
switches -F10-/-F11- |
Note
| The door contact switch is installed in the door lock and
cannot be renewed separately in the event of malfunction. |
| – |
Removing and installing rear door lock
→ General body repairs, exterior; Rep. gr.58. |
|
|
|
Special tools and workshop equipment
required
Removal wedge -3409-
Note
...
Note
The electromechanical parking brake button -E538- and the
auto-hold button -E540- are combined to form one component and
cannot be separated ...
Other materials:
Stowage compartment in the front centre console
Fig. 111 In the centre console: stowage
compartment
First read and observe the introductory information
and safety warnings To open, briefly press the cover of the stowage
compartment (arrow).
To close, push the stowage compartment cover down as far as it will go.
The stowage co ...
Removing engine
Special tools and workshop equipment required
Removal lever -80 - 200-
Extension -2024 A /1- of lifting tackle -2024 A-
Engine and gearbox jack -V.A.G 1383 A- or -VAS 6931-
Engine bracket -T10497-
Drip ...
Removing and installing tensioner for poly V-belt, vehicles without air
conditioner compressor
Removing
–
Remove poly V-belt from tensioner
→ Chapter „Removing and installing poly V-belt, vehicles without
air conditioner compressor“.
–
...
© 2016-2026 Copyright www.vwgolf.org

 Removing and installing button for deactivating interior monitoring and
vehicle inclination sensor -E616-
Removing and installing button for deactivating interior monitoring and
vehicle inclination sensor -E616- Removing and installing electromechanical parking brake button
-E538-/auto-hold button -E540-
Removing and installing electromechanical parking brake button
-E538-/auto-hold button -E540-