Volkswagen Golf Service & Repair Manual: Removing and installing rear footwell vent
 Note Note
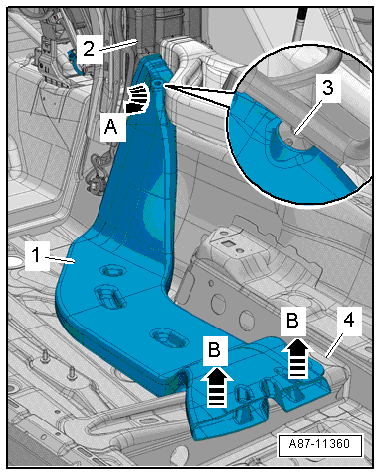
| The illustration shows a left-hand drive vehicle. The
removal and installation procedure is identical for both sides. |
| – |
Remove the sill panel moulding
→ General body repairs, interior; Rep. gr.70. |
| – |
Remove the front seat
→ General body repairs, interior; Rep. gr.72. |
| – |
Remove centre console
→ General body repairs, interior; Rep. gr.68. |
| – |
Lift the floor covering in the area of the vent. |
|
|
|
| – |
Prise off the cable clip -3-. |
| – |
Lift up the rear footwell vent
-1--arrows B-, detach from the heater and air
conditioning unit -2--arrow A- and
take out to the side. |
|
|
|
| Installation is carried out in the reverse order. When
installing, note the following: |
| – |
Check the cable clip -1- for
damage before pressing on at the footwell vent
-2-. |
Note
| A loose cable clip or damaged seal can lead to flow noise. |
|
|

|
Removing
Pyrotechnic components may trigger unintentionally.Risk of
injury.Discharge any static charge accumulated in your body by briefly
touching striker pl ...
Note
The illustration shows a left-hand drive vehicle.
Removing
–
Remove centre console
→&n ...
Other materials:
Filling the tank with petrol, diesel or E85
Fig. 188 Open tank flap with tank cap attached
to the holder
First read and observe the introductory information
and safety warnings Switch off the engine, ignition, mobile telephone and
auxiliary heater before filling the tank and leave them switched
off during refilling.
Opening the ...
Front centre armrest
Assembly overview - front centre armrest
1 -
Front centre armrest
Removing and installing
→ Chapter
Removing and installing front centre armrest
Removing and installing front centre
armrest
&nbs ...
Removing and installing charge pressure positioner -V465-
Removing
–
Switch off ignition.
–
Disconnect electrical connector -1-.
–
Remove securing clip -2-.
–&n ...
© 2016-2026 Copyright www.vwgolf.org

 Removing and installing driver side footwell vents, RHD vehicles
 Removing and installing rear centre console vent duct