Volkswagen Golf Service & Repair Manual: Removing and installing rear door window

| – |
Remove rear door trim
→ General body repairs, interior; Rep. gr.70. |
| – |
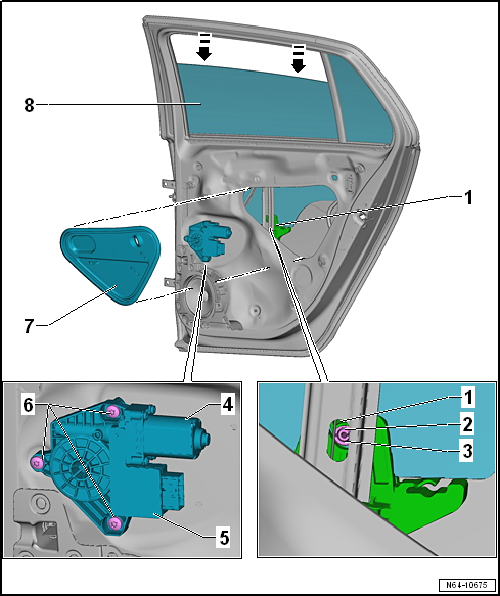
Remove inner door cover -8-. |
| – |
Lower door window -9- until spreader
pin -3- and spreader plug
-4- are accessible in cut-out of window
regulator -2-. |
 Note
Note
| If work is not possible due to a malfunction caused by electric
window regulator, window regulator motor -5-
is unbolted -7-. Window can then be pushed
to required working position. |
| – |
Screw 5 mm bolt (approx. 70 mm long) into spreader pin
-3-, and pull bolt together with spreader
pin out of spreader plug -4-. |
| – |
Screw an 8 mm bolt (approx. 80 mm long) into spreader plug
-4-. |
Note
| When screwing bolt into spreader plug, do not apply excessive
pressure on plug. It otherwise falls inwards into door. |
| – |
Pull spreader plug -3- out of window
regulator guide -2- and therefore out of
door window. |
| – |
Pull front part of window channel -2-
out of mounting. |
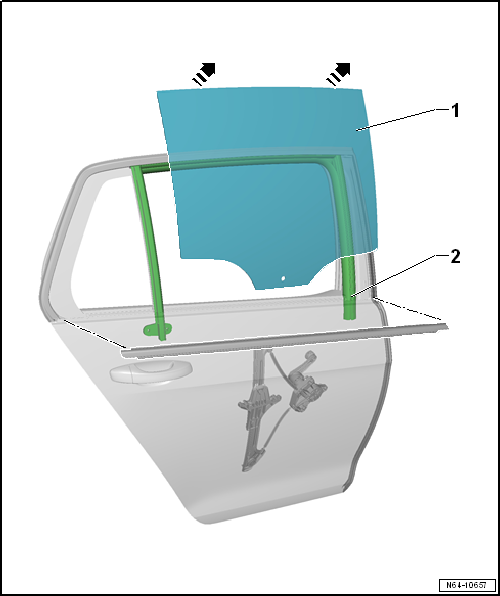
| – |
Pull door window -1- upwards at an
angle -arrows- to vehicle exterior out of
window slot. |
Note
| |
When installing door window, always renew spreader plug and
spreader pin. |
| |
Before inserting spreader plug -3-
and spreader pin -4-, check window
glass -1- for damage. |
|
|
|
| – |
Insert spreader plug -4- and centre it
in the middle with the window glass -1-
removed. |
| – |
Press spreader pin -3- flush into
spreader plug -4-. |
| – |
Insert door window -9- into door
-1--arrows- and insert door window into
slot of window regulator guide. |
| – |
Make window -1- engage in window
regulator -2- by pressing slightly from
above. |
| – |
Then perform remaining installation in reverse order of removal. |
| – |
Carry out functional test before fitting door trim. |
Special tools and workshop equipment
required
...
Removing
–
Remove door trim
→ General body repairs, interior; Rep. gr.70.
–&n ...
Other materials:
Removing and installing speed sensors on front axle -G45-/-G47-
Note
Removal and installation is described for the front left
speed sensor. Removal and installation of the front right speed
sensor is analogous.
Removing
–
Raise vehicle.
&n ...
Priming plastic materials
Adhesion promoter (transparent)
Designation:
Adhesion promoter -ALO 822 000 10- (transparent)
Issued 06/2011
Product description
This transparent adhe ...
Changing engine oil
First read and observe the introductory information
and safety warnings The engine oil must be changed regularly in accordance
with the data given in the service schedule.
The engine oil and filter change should always be carried out by a qualified
workshop due to the special tools and kno ...
© 2016-2026 Copyright www.vwgolf.org

 Removing and installing front door window
 Removing and installing fixed rear door window