Volkswagen Golf Service & Repair Manual: Removing and installing washer jets
 Note Note
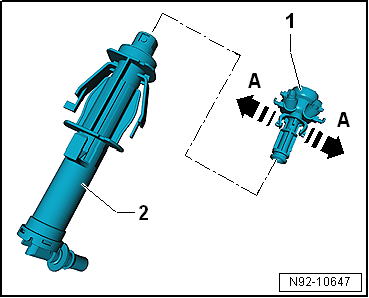
| Removal and installation are described for the left side.
Removal and installation on the right side are carried out in
the same way. |
| – |
Remove pop-up cylinder
→ Chapter. |
|
|
|
| – |
Press fasteners in direction of arrow
-A-. |
| – |
Pull spray jet -1- out of
pop-up cylinder -2-. |
| Install in the reverse order of removal, observing the
following: |
Note
| Ensure that the spray jet engages audibly when being pushed
into the pop-up cylinder. |
|
|
|
Note
| The delivered spray jets are preset by the manufacturer so
that there is no need to adjust them following installation. |
| – |
Checking adjustment of spray jets
→ Booklet36.1. |
|
|
|
Washer fluid lines
| Repairing washer fluid lines |
Note
| All instructions and notes regarding this chapter are
available under
→ Electrical System, General Information; Rep. gr.92. |
|
|
|
Special tools and workshop equipment
required
Drip tray
Removing
Note
Removal and ...
© 2016-2026 Copyright www.vwgolf.org

 Removing and installing pop-up cylinder, »R«