Volkswagen Golf Service & Repair Manual: Removing and installing pop-up cylinder
| Special tools and workshop equipment
required |
 Note Note
| Removal and installation are described for the left side.
Removal and installation on the right side are carried out in
the same way. |
| – |
Remove front wheel housing liner
→ General body repairs, exterior; Rep. gr.66. |
| – |
Remove noise insulation
→ General body repairs, exterior; Rep. gr.66. |
| – |
Place drip tray under pop-up cylinder. |
|
|
|
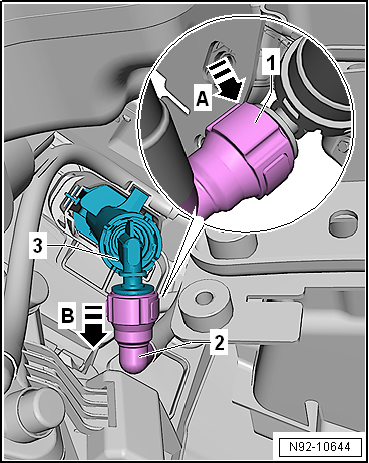
| – |
Press release button -1- in
direction of arrow -A-. |
| – |
Pull water hose -2- off pop-up
cylinder -3- in direction of arrow
-B-. |
Note
| The removal of the cap should be carried out with aid of a
second person. |
|
|
|
| – |
Working with compressed air, drive pop-up cylinder together
with cap -1- out of bumper cover
and hold it in place. |
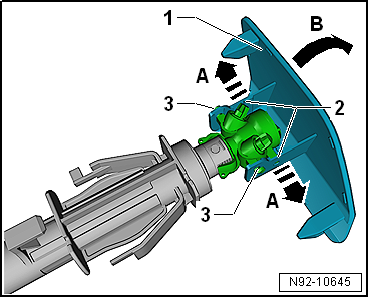
| – |
Press cap -1- on both sides out
of upper mountings -2- in direction
of arrow -A-. |
| – |
Swing cap -1- in direction of
arrow -B- and unclip it from lower
mountings -3-. |
|
|
|
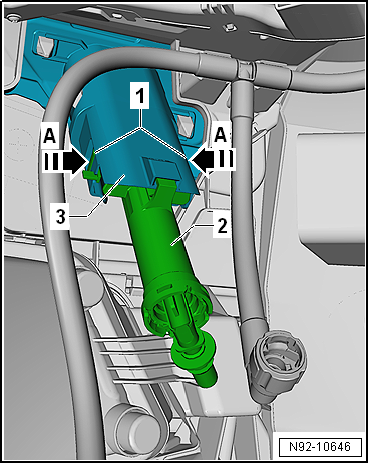
| – |
Press release buttons -1- in
direction of arrow -A-. |
| – |
Pull pop-up cylinder -2-
downwards out of mounting -3-. |
| Install in the reverse order of removal, observing the
following: |
Note
| Observe the markings distinguishing the pop-up cylinders for
left and right. |
| Ensure that the pop-up cylinder engages audibly when being
pushed into the mounting. |
| When connecting the washer fluid line, ensure that the
securing clip engages audibly in the connection. |
|
|
|
Special tools and workshop equipment
required
Drip tray
Removing
–
Remove washer fl ...
Special tools and workshop equipment
required
Drip tray
Removing
Note
Removal and ...
© 2016-2026 Copyright www.vwgolf.org

 Removing and installing headlight washer system pump -V11-,
»R«
Removing and installing headlight washer system pump -V11-,
»R« Removing and installing pop-up cylinder, »R«