Volkswagen Golf Service & Repair Manual: Removing and installing mounting bracket, RHD vehicles
| – |
Remove wiper arms
→ Electrical system; Rep. gr.92. |
| – |
Remove plenum chamber cover
→ General body repairs, exterior; Rep. gr.50. |
| – |
Remove wiper motor -V-
→ Electrical system; Rep. gr.92. |
|
|
|
| – |
Remove dash panel end cover on driver side
→ General body repairs, interior; Rep. gr.70. |
| – |
Remove footwell cover on driver side
→ General body repairs, interior; Rep. gr.68. |
| – |
Remove storage compartment on driver side
→ General body repairs, interior; Rep. gr.68. |
| – |
Remove dash panel cover on driver side
→ General body repairs, interior; Rep. gr.68. |
| – |
Remove knee airbag
→ General body repairs, interior; Rep. gr.69. |
| – |
Observe safety precautions for working on airbags
→ General body repairs, interior; Rep. gr.00. |
|
|
|
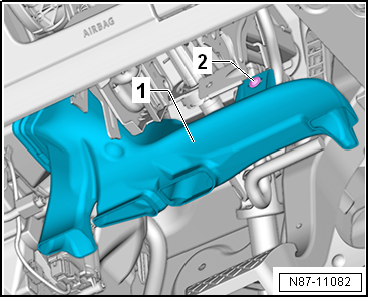
| – |
Remove footwell vent -1- on
driver side
→ Heating, air conditioning system; Rep. gr.87. |
| – |
To do this, unscrew bolt -2-
and remove footwell vent on driver side
-1-. |
| – |
Unbolt crash bar for brake pedal and lay it to one side
→ General body repairs, interior; Rep. gr.70. |
| – |
Separate brake pedal from brake servo
→ Chapter. |
|
|
|
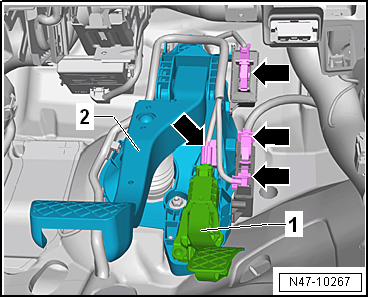
| – |
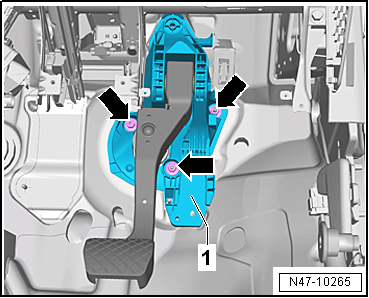
Release connectors -arrows- and
pull off. |
| – |
Remove accelerator pedal module -1-
from mounting bracket -2-
→ Rep. gr.20. |
|
|
|
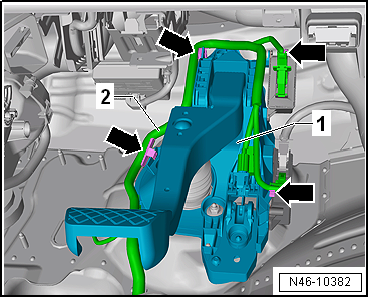
| – |
Unclip wiring harness -2- from
mounting bracket -1--arrows-. |
|
|
|
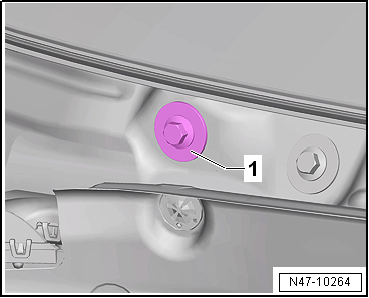
| – |
Remove nuts -arrows- from
mounting bracket -1-. |
|
|
|
| – |
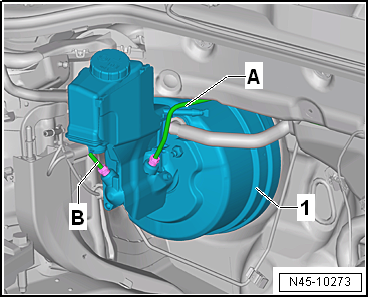
Secure brake servo -1- against
falling. |
| Install in reverse order. Note the following when doing
this: |
|
|
|
| – |
Ensure to route wiring harness -2-
correctly so that it is not trapped. |
| – |
Clip wiring harness -2- to
mounting bracket -1--arrows-. |
| – |
Connect brake pedal to brake servo
→ Chapter. |
| → Chapter „Assembly overview - brake pedal, RHD vehicles“ |
| Crash bar
→ General body repairs, interior; Rep. gr.70. |
| Footwell vents
→ Heating, air conditioning system; Rep. gr.87. |
| Knee airbag
→ General body repairs, interior; Rep. gr.69. |
| Covers on driver side
→ General body repairs, interior; Rep. gr.68 |
| Windscreen wiper system
→ Electrical system; Rep. gr.92 |
| Plenum chamber cover
→ General body repair, exterior; Rep. gr.50 |
|
|
|
Remove dash panel end cover on driver side
→ General body repairs, interior; Rep. gr.70.
–
Remove footwell cover on driv ...
Other materials:
Removing and installing inner door cover
Special tools and workshop equipment
required
Note
Removal and installation are described only for the left
cover. The right side is similar.
Removing
...
Removing and installing front seat
Note
Removal and installation is described for the left
seat. Apply the same instructions for removal and
installation of the right seat as appropriate.
Removal and instal ...
Damage caused by foreign bodies
Driving over hard, pointed objects like nails, screws and
the like can pierce the tyre.
This always leads to tyre damage.
Damage due to embedded foreign body
Often ...
© 2016-2026 Copyright www.vwgolf.org

 Removing and installing mounting bracket, LHD vehicles