Volkswagen Golf Service & Repair Manual: Overview of fitting locations - infotainment system
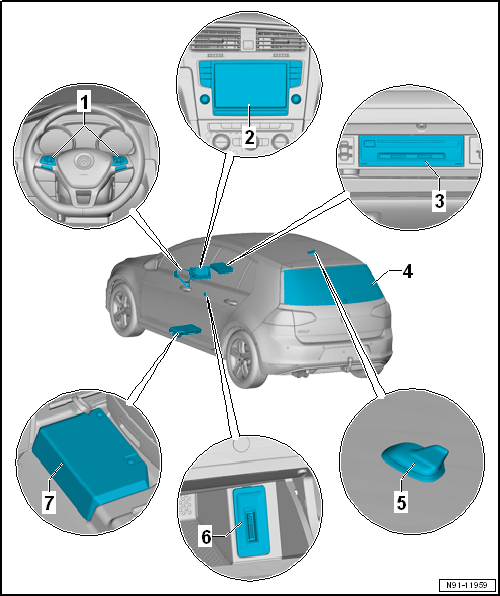
| 1 - |
Multifunction buttons in steering wheel |
| Multifunction buttons on left in steering wheel -E440- |
| Multifunction buttons on right in steering wheel -E441- |
| Removing and installing
→ Chapter. |
| 2 - |
Display unit for control device of front display and information
control panel -J685- |
| In dash panel in the middle |
| Infotainment system Composition Touch and Composition Colour
version: Combined with control unit 1 for information electronics -J794- |
| Removing and installing
→ Chapter. |
| Infotainment system Composition Media and Discover Media version or
Discover Pro version: Individual display |
| Removing and installing
→ Chapter. |
| 3 - |
Control unit 1 for information electronics -J794- |
| Infotainment system Composition Touch and Composition Colour
version: Combined with display unit for control device of front display
and information control panel -J685- |
| Removing and installing
→ Chapter. |
| Infotainment system Composition Media and Discover Media version or
Discover Pro version: In glove compartment |
| Removing and installing
→ Chapter |
| Connector assignment → Current flow
diagrams, Electrical fault finding and Fitting locations. |
| 6 - |
Connection for external multimedia devices |
| In the front centre console storage compartment |
| Removing and installing
→ Chapter |
| 7 - |
Digital sound package control unit -J525- |
Control unit 1 for information electronics -J794-
Display unit for control device of front display and
information control panel -J685-
...
Special tools and workshop equipment
required
Removal wedge -3409-
...
Other materials:
Repairs to contacts in contact housings
If necessary, first open or disengage the secondary locking
mechanism of the contact housing
→ Chapter.
–
Disengage the contact (primary locking mechanism) using the
approp ...
Performing maintenance test
WARNING
It is not permissible to test or charge batteries
whose colour indicator is light yellow. Do not
slave/jump start the vehicle!
Danger of explosion when checking and charging ...
Removing and installing valve, description of the valve
1. Valve body
1 -
Valve body
2 -
Valve core
3 -
Valve cap
The rubber valve for tubeless tyres is designed to create an
air-tight sea ...
© 2016-2026 Copyright www.vwgolf.org


 Layout - infotainment system, Discover Pro version
 Removing and installing infotainment system display