Volkswagen Golf Service & Repair Manual: Removing and installing lock cylinder
| Removing and installing lock cylinder |
| Special tools and workshop equipment
required |
|
|
|
 Note Note
| |
The removal and installation sequence is only for the
left lock cylinder. The right side is similar. |
| |
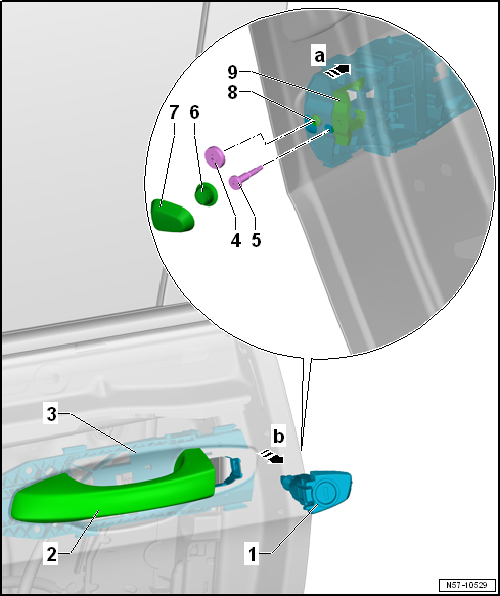
Different covers -4, 6 or 7-
might be installed. |
|
|

Torque wrench -V.A.G 1783- |
| – |
Remove cover cap for lock cylinder
→ Chapter |
| – |
Lift covers -4 and 6- or
-7-. |
| – |
Screw out bolt -8- to stop. |
| – |
Press in bolt -8- with locking
mechanism -9--arrow a-. Only then is the
lock cylinder released. |
| – |
Pull door handle -2- off door. |
| – |
Pull lock cylinder housing -1-
perpendicular -arrow b- to the door out of
the mounting bracket -3-. |

| – |
Pull door handle -2- off door. |
| – |
Push lock cylinder housing -1- into
door handle bracket -3- at a right-angle
-arrow a-. |
| – |
Screw bolts -5 and 8- into mounting
bracket. Bolt -8- is used to pull locking
mechanism -9- in its correct position
-arrow b-. |
Note
| During installation, lock cylinder housing must be pressed against
outer door panel. |
| Further installation is performed in the reverse order of removal. |
| l |
It is essential that a functional check is then performed with the
door open. |
- Bolts
→ Chapter „Assembly overview - door handle and door lock“
Note
The cover cap is installed when no lock cylinder is fitted.
Removing
Special tools and workshop equipment
...
Removing
Note
Removal and installation are described only for the right
door handle. The left side is similar.
...
© 2016-2026 Copyright www.vwgolf.org

 Removing and installing cover cap, without lock cylinder
 Removing and installing door handle