Volkswagen Golf Service & Repair Manual: Removing and installing headlight range control motor -V48-/-V49- (gas
discharge headlights)
 Note Note
| Removal and installation are described for the left side.
Removal and installation on the right side are carried out in
the same way. |
| – |
Remove headlight
→ Chapter. |
|
|
|
| – |
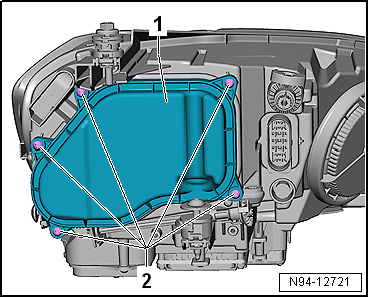
Unscrew bolts -2- from housing
cover -1-. |
| – |
Remove housing cover -1-. |
|
|
|
| – |
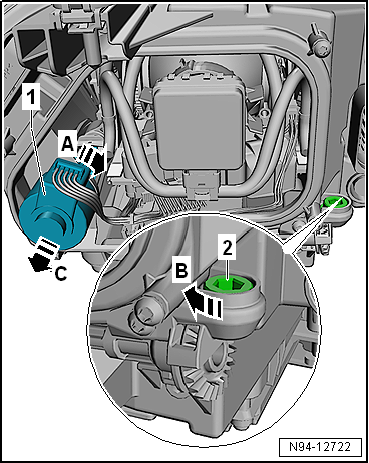
Release left headlight range control motor -V48--1-:
for left headlight, turn in direction of arrow
-A-; for right headlight, turn
opposite direction of arrow -A-. |
| – |
Turn left headlight range control motor -V48--1-
in direction of arrow -C-. |
| – |
Turn height adjuster -2- in
direction of arrow -B- (lower
reflector). Maintain tension on left headlight range control
motor -V48--1- during this step. |
| – |
Pull left headlight range control motor -V48--1-
out of headlamp height adjuster in direction of arrow
-C-. |
| – |
Disconnect electrical connector. |
| Install in the reverse order of removal, observing the
following: |
 Caution
| Risk of damage to the headlight. |
| Make sure the housing cover is correctly seated when
installing. The ingress of water will lead to permanent
damage to the headlight. |
|
| – |
Connect electrical connector whilst pushing in left
headlight range control motor -V48-. |
| – |
Pull reflector towards rear and press left headlight range
control motor -V48- into headlight range adjuster until motor
can be heard to engage. |
| – |
Engage left headlight range control motor -V48--1-
opposite direction of arrow -A-. |
| – |
Turn height adjuster -2-
opposite direction of arrow -B-.
The reflector must move. |
| – |
Check headlight setting and adjust headlight if necessary
→ Booklet36.1 |
|
|
 |
Note
Removal and installation are described for the left side.
Removal and installation on the right side are carried out in
the same way.
...
Special tools and workshop equipment
required
Torque screwdriver -VAS 6494-
Not ...
© 2016-2026 Copyright www.vwgolf.org


 Removing and installing headlight range control motor -V48-/-V49- (dual
halogen headlights)
Removing and installing headlight range control motor -V48-/-V49- (dual
halogen headlights) Removing and installing headlight range control motor -V48-/-V49-, LED
headlights
Removing and installing headlight range control motor -V48-/-V49-, LED
headlights