Volkswagen Golf Service & Repair Manual: Removing and installing dash panel insert -KX2-
| Special tools and workshop equipment
required |
| Vehicle diagnostic tester |
 Note Note
| All indicator lamps in the dash panel insert -KX2- are
equipped with LEDs. LEDs cannot be renewed separately if
defective. The dash panel insert must be renewed. |
| The dash panel insert -KX2- must not be dismantled. |
| For greater clarity, the steering wheel is not shown.
However, it is not necessary to remove the steering wheel before
removing the dash panel insert -KX2-. |
| If the dash panel insert -KX2- with control unit in dash
panel insert -J285- is to be renewed, data must be read using
vehicle diagnostic tester. |
| Following components are integrated in the dash panel insert
-KX2-: |
| Control unit in dash panel insert -J285- |
| Coolant temperature gauge -G3- |
| – |
Move steering wheel to rearmost and lowest position. Use the
entire range of adjustment of the steering column for this
purpose. |
| – |
Remove ignition key, if inserted. |
| – |
Remove upper steering column trim
→ General body repairs, interior; Rep. gr.68. |
|
|
|
| – |
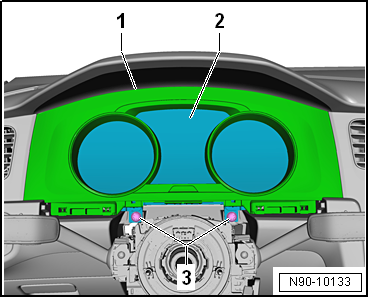
Remove dash panel insert trim -1-
→ General body repairs, interior; Rep. gr.70. |
Note
| The dash panel insert -KX2- is engaged in the dash panel.
Therefore, a greater force is necessary to remove it. |
| – |
Pull out dash panel insert -KX2--2-
until it makes contact with steering wheel. |
| – |
Disconnect electrical connector. |
|
|
|
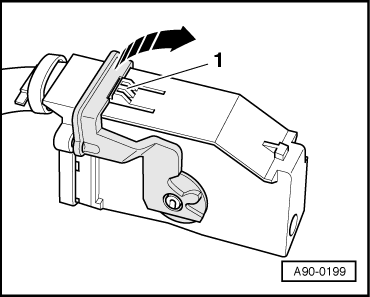
| – |
Press locking detent -1- to
disconnect connector. |
| – |
Swing retainer in -direction of arrow-
and pull off connector. |
| – |
Remove dash panel insert -KX2- towards front passenger side
between steering wheel and dash panel. |
| Install in the reverse order of removal, observing the
following: |
| → Chapter „Assembly overview - dash panel insert“ |
|
|
|
1 -
Electrical connector
For dash panel insert
2 -
Dash panel insert -KX2-
With control unit in dash panel inser ...
Other materials:
Assembly overview - sump and oil pump
Note
Metal shavings or a large quantity of small metal particles found
during engine repair could indicate that the crankshaft bearings or
conrod bearings are damaged. To avoid any subsequent damage, the
following work must be carried out following the repair: Caref ...
Checking holding pressure
Special tools and workshop equipment required
Pressure tester -VAS 6550-
Removal wedge -3409-
Connector cable -VAS 6550/3-3-
Connector cable -VAS 6550/3-4-
Vehicle diagnostic tester
...
Adapters for setting up purging circuits
The following table contains the various adapters that are
necessary to connect the air conditioner service station to the
refrigerant circuit for purposes of purging and to bridge the
removed reservoir or collector and expansion valve
(vehicle-specific) ...
© 2016-2026 Copyright www.vwgolf.org

 Assembly overview - dash panel insert
 Horn
Horn