Volkswagen Golf Service & Repair Manual: Removing and installing coupling rod
| Special tools and workshop equipment
required |
|
|
|
| Torque wrench -V.A.G 1331- |
| – |
Remove spring
→ Chapter. |
|
|
|
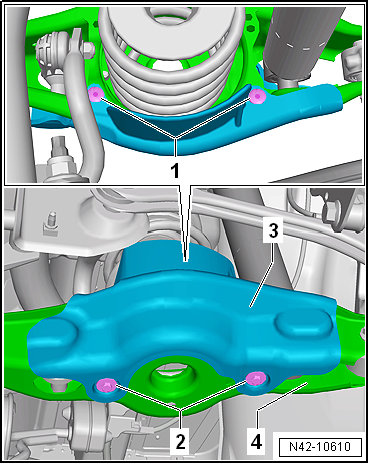
| Vehicles with stone guard |
| – |
Remove spreader rivet -1-. |
| – |
Unscrew bolts -2- for stone
deflector -3-. |
| Continuation for all vehicles |
|
|
|
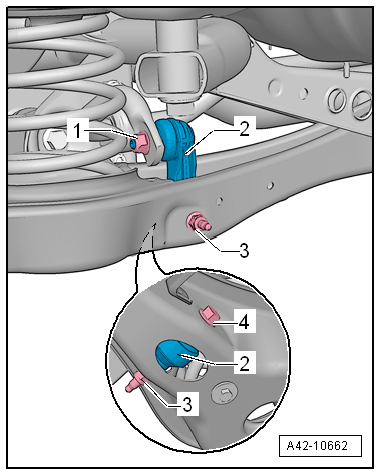
| – |
Unscrew nuts -1- and
-3-, and pull out bolt
-4-. |
| – |
Pull coupling rod -2- out of
anti-roll bar and trailing arm. |
| Install in reverse order of removal, observing the
following: |
|
|
|
| – |
Insert coupling rod -2-, fit
nuts -1- and
-3- and tighten in unladen position
→ Chapter. |
| – |
When tightening nut -1-,
counterhold at multi-point socket of bolt. |
| → Chapter „Assembly overview - anti-roll bar“ |
| → Chapter „Torque settings for wheel bolts“ |
|
|
|
Special tools and workshop equipment
required
Torque wrench -V.A.G 1331-
Re ...
Other materials:
Assembly overview - coolant pipes
1 -
Coolant hose
2 -
Coolant pipe
Clipped onto intake manifold (bottom)
To remove, remove intake manifold
→ Chapter.
3 -
Bolt
8 Nm
4&nb ...
Introduction
This chapter contains information on the following subjects:
→ Fuses in the vehicle
→ Fuse table
→ Fuse tables for fuses in the engine compartment
→ Changing a blown fuse
At the time of print we are unable to provide an complete overview of the locations
of t ...
Removing and installing brake servo, LHD vehicles
Special tools and workshop equipment
required
Torque wrench -V.A.G 1331-
Torque wrench -V.A.G 1410-
...
© 2016-2026 Copyright www.vwgolf.org

 Removing and installing anti-roll bar