Volkswagen Golf Service & Repair Manual: Removing and installing battery, vehicles without high-voltage system
| Special tools and workshop equipment
required |
|
|
|
| Torque wrench -V.A.G 1331- |
|
|
|
| Torque wrench -V.A.G 1783- |
 WARNING
| Always make sure to comply with the warning notices
and safety regulations when working on the battery
→ Electrical system, General information; Rep. gr.27. |
|
| – |
Remove ignition key, if inserted. |
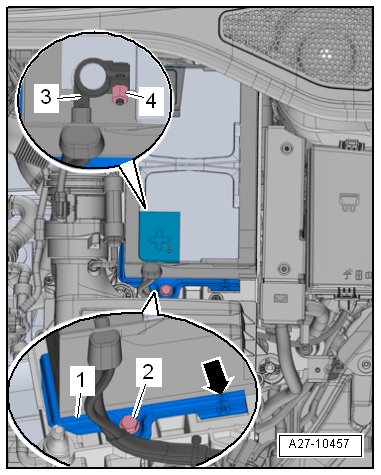
| – |
Open cover in heat insulation sleeve. |
|
|
|
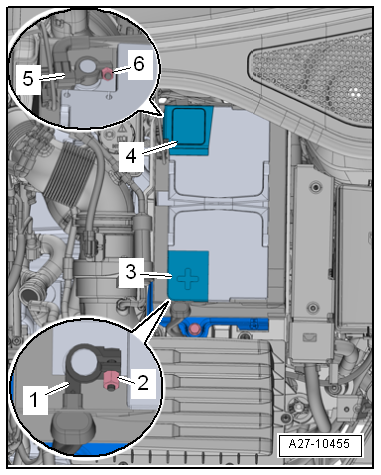
| – |
Open cover -4- for negative
battery terminal. |
| – |
Loosen nut -6- several turns
and disconnect battery terminal clamp -5-
of earth cable from negative battery terminal. |
| – |
Open cover -3- for positive
battery terminal. |
| – |
Loosen nut -2- several turns
and disconnect battery terminal clamp -1-
of positive cable from positive battery terminal. |
|
|
|
| – |
Insert battery -A- into battery tray
-1- so that battery base strip lies against stop at back
and sides -arrows-. |
| It should no longer be possible to move battery -A- towards
rear or sides. |
|
|
|
| – |
Fit securing bracket -1-. |
| Make sure that lug -arrow- on
securing bracket -1- engages into
recess in battery base strip. |
| – |
Tighten bolt -2- for securing
bracket -1-. |
| – |
Ensure that battery -A- is seated securely. |
| With ignition and electrical equipment switched off, connect
battery -A- in the following sequence: |
| – |
Fit battery terminal clamp -3-
of positive cable to positive battery terminal “+”. |
| – |
Reconnect battery -A-
→ Chapter. |
 Note Note
| If the battery is renewed, the battery monitor control unit
-J367- must be adapted
→ Chapter. |
| → Chapter „Assembly overview – battery, vehicles without
high-voltage system“ |
|
|
|
1 -
Battery tray
2 -
Battery cover
3 -
Retaining clip
4 -
Nut
20 Nm
...
Special tools and workshop equipment
required
Torque wrench -V.A.G 1331-
...
Other materials:
Assembly overview - rear wheel housing liner
Note
Minor differences may be encountered in respect of front wheel
housing liner, depending on vehicle model.
Only the left side is shown. The right side is similar.
1 -
Rear wheel housing liner
Materi ...
Removing and installing front parking aid senders
Removing
–
Remove radiator grille
→ General body repairs, exterior; Rep. gr.66.
Caution
Risk of damage to component.
...
Assembly overview - drive shaft
1 -
Outer constant velocity joint
Renew only as complete unit
Removing
→ Fig..
Installing: drive onto shaft to stop using plastic hammer
Distribute grease evenly in joint
Ch ...
© 2016-2026 Copyright www.vwgolf.org

 Caution
 Assembly overview – battery, vehicles with high-voltage system
 Removing and installing battery, vehicles with high-voltage system