Volkswagen Golf Service & Repair Manual: Assembly overview – battery, vehicles with high-voltage system
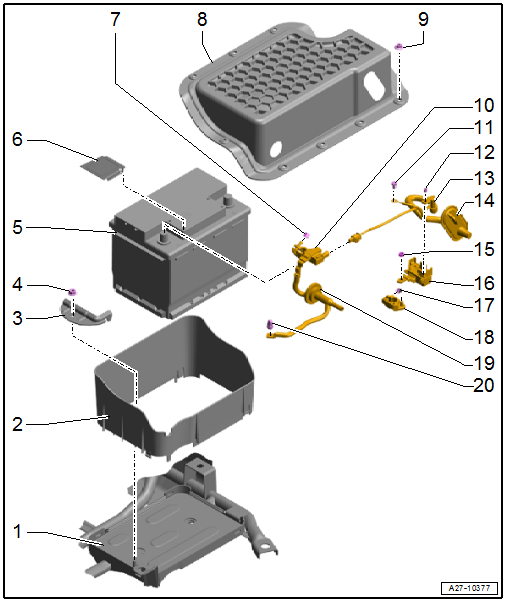
| 1 - | Battery tray |
| 2 - | Battery cover |
| 3 - | Retaining clip |
| 4 - | Nut |
| 20 Nm |
| 5 - | Battery -A- |
| Removing and installing → Chapter |
| Disconnecting and connecting → Chapter |
| 6 - | Cover |
| For negative battery terminal |
| 7 - | Nut |
| 6 Nm |
| 8 - | Cover for battery compartment |
| 9 - | Nut |
| Qty. 9 |
| 9 Nm |
| 10 - | Earth cable |
| With battery terminal clamp and battery monitor control unit -J367- |
| Removing and installing → Chapter |
| Disconnecting and connecting → Chapter |
| Adapting battery monitor control unit -J367- → Chapter |
| 11 - | Bolt |
| Specified torque → Item |
| 12 - | Nut |
| Specified torque → Item |
| 13 - | Positive cable |
| With wiring harness |
| Disconnecting and connecting → Chapter |
| 14 - | Grommet |
| 15 - | Nut |
| Specified torque → Item |
| 16 - | Fuse holder, battery |
| Overview of fitting locations → Chapter |
| 17 - | Nut |
| 6 Nm |
| 18 - | Battery terminal clamp |
| For positive cable |
| 19 - | Grommet |
| 20 - | Nut |
| 9 Nm |
 Assembly overview – battery, vehicles without high-voltage system
1 -
Retaining clip
2 -
Bolt
Specified torque: 15 Nm
3 -
Nut
Specified torque: 6 Nm
...
 Removing and installing battery, vehicles without high-voltage system
Special tools and workshop equipment
required
Torque wrench -V.A.G 1331-
...
Other materials:
Fixing position of subframe, multi-link suspension, front-wheel drive, Golf
GTE
Special tools and workshop equipment
required
Locating pins -T10096-
Engine and gearbox jack -VAS 6931-
I ...
Repairs to wiring with cross sections up to 0.35 mm2
Special tools and workshop equipment
required
Crimping pliers, complete -VAS 1978/1 A-
Head adapter 0.35 mmІ - 2.5 mmІ -VAS 1978/1-1-
For repairs to ...
Removing and installing window regulator motor -V26-/-V27
Special tools and workshop equipment
required
Note
Removal and installation are only described for the
left window regulator motor. ...
