Volkswagen Golf Service & Repair Manual: Assembly overview - rear wheel housing liner
 Note
Note
| |
Minor differences may be encountered in respect of front wheel
housing liner, depending on vehicle model. |
| |
Only the left side is shown. The right side is similar. |
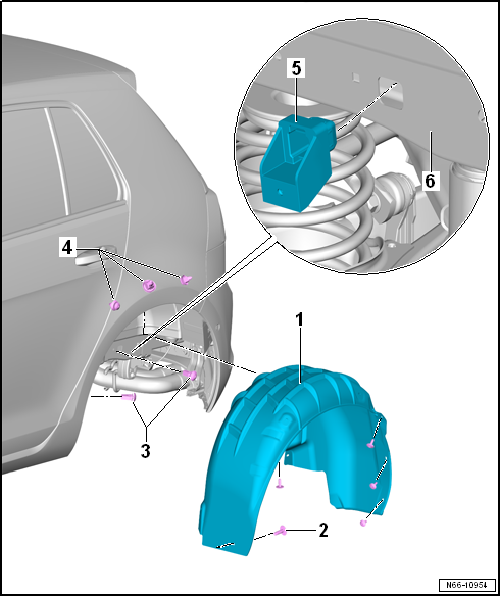
| 1 - |
Rear wheel housing liner |
- Material PP/EPDM
- Removing and installing
→ Chapter
- Qty. 10 on each side
- 2.0 Nm
- Qty. 3 on each side
- Gas-tight
 DANGER! DANGER!
| Check gas-tight spreader nuts for damage and renew if
necessary. |
| The spreader nuts seal the interior against exhaust gases
and have to be renewed without fail in the event of damage. |
|
- On right side only, not for petrol engines
- Mounting prior to installing the rear wheel housing liner
-1
| 6 - |
Rear longitudinal members |
| Assembly overview - sill panel cover |
|
|
|
Note
| Only the left side is shown. The right side is similar. |
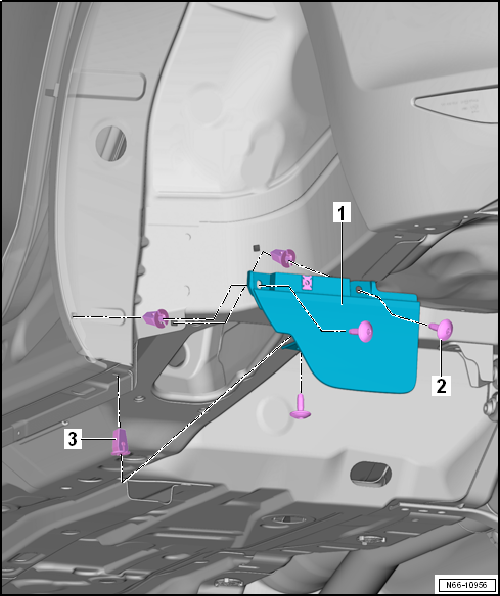
- Removing
- Release rear wheel housing liner
→ Chapter
- Unscrew bolts -2- and remove sill panel
cover downwards
- Installing
Note
| Check spreader nut for damage and renew if necessary. |
- Position and bolt sill panel cover
Note
Minor differences may be encountered in respect of front
wheel housing liner, depending on vehicle model.
Only the l ...
Special tools and workshop equipment
required
Torque wre ...
Other materials:
Removing and installing trim panel
Note
Removal and installation are described for the trim panel on
driver side. Follow same instructions for the front passenger side
as appropriate.
Removal and installation are illustrated for 4-door vehicles.
...
Sprayable sealant
Designation:
Sprayable sealant -D 476 KD1 M2-, grey
Sprayable sealant -D 476 KD2 M2-, black
Issued 08.2012
Product description
Sprayable sealant -D 476 ...
Test prerequisites
Radiator and condenser must be clean (clean them if
necessary).
The heat insulation on expansion valve is OK and properly
installed. See vehicle-specific repair manual
→ Rep. gr.87.
The poly V ...
© 2016-2026 Copyright www.vwgolf.org


 Assembly overview - front wheel housing liner
 Removing and installing rear wheel housing liner