Volkswagen Golf Owners Manual: Remote control
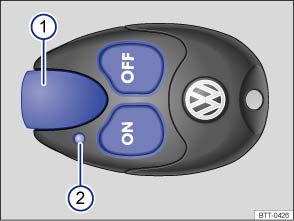
Fig. 185 Auxiliary heater: remote control
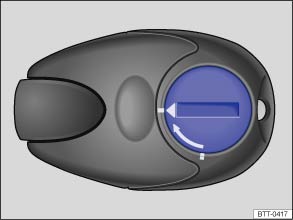
Fig. 186 Auxiliary heater: battery cover for the remote control
 First read and observe the introductory information
and safety warnings
First read and observe the introductory information
and safety warnings | Meaning | |
|---|---|
  |
Switches on the auxiliary heater. |

|
Switches off the auxiliary heater. |
| ① | Aerial. |
| ② | Indicator lamp. |
Pressing the button in the remote control can switch on the auxiliary heater unintentionally. This also applies if you are outside the effective range of the control or the indicator lamp is flashing.
Indicator lamp in the remote control
The indicator lamp in the remote control provides the user with a variety of information after each input:
| Indicator lamp | Meaning |
|---|---|
| Lights up green for approximately 2 seconds. | The auxiliary heater has been switched on with
.
|
| Lights up red for approximately 2 seconds. | The auxiliary heater has been switched off with
. |
| Flashes green slowly for approximately 2 seconds (around four times per second). | The signal to switch on has not been received a). |
| Flashes green rapidly for approximately 2 seconds (around ten times per second). | The auxiliary heater is blocked. Possible reasons: the fuel tank is nearly empty, the vehicle battery is weak or there is a fault. |
| Flashes red for approximately 2 seconds (around four times per second). | The signal to switch off has not been received a). |
| Lights up orange for approximately 2 seconds, then turns green/red. | The battery in the remote control is weak. However, the switch on/off signal has still been received. |
| Lights up orange for approximately 2 seconds, then turns green/red. | The battery in the remote control is weak. The switch on/off signal has not been received. |
| Flashes orange for approximately 5 seconds. | The battery in the remote control is discharged. The switch on/off signal has not been received. |
Replacing the battery for the remote control
If the indicator lamp in the remote control flashes orange for approximately 5 seconds when the button is pressed, or does not light up, the battery in the remote control must be replaced.
The battery is located on the rear side of the remote control underneath a cover.
- To open the cover, use a flat object (e.g. a coin) to turn the slot against the direction of the arrow to the mark .
- Remove the batteries.
- Fit new battery. When changing the batteries, ensure that they are inserted correctly (poles) and that they are the same type .
- Fit the battery cover and turn in the direction of the arrow until it reaches the mark indicating its starting position.
Range
The receiver is located in the vehicle interior. The remote control key has a range of several hundred metres when the battery is fully charged. The range of the remote control key can be considerably reduced by obstacles between the remote control key and the vehicle, bad weather conditions, and a flat battery.
To achieve optimal range, hold the remote control vertically with the aerial at the top. Do not hold the aerial with your fingers or the palm of your hand.
The distance between the remote control and the vehicle must be at least 2 metres.

 NOTICE
- The remote control contains electronic components. Protect the remote control from moisture, excessive vibration and direct sunlight.
- Unsuitable batteries can damage the remote control. Replace a discharged battery only with a new battery of the same voltage rating, size and specification.

Discharged batteries must be disposed of in accordance with regulations governing the protection of the environment.
The battery in the remote control may contain perchlorate. Please comply with legislation regarding disposal.

Protect the remote control against inadvertent operation in order to prevent the auxiliary heater from being switched on unintentionally.
a) The remote control is out of range. Move closer to the vehicle and press the corresponding button again.
 Switching the auxiliary heater on or off
First read and observe the introductory information
and safety warnings
Switching on the auxiliary heater:
Manually
with the ...
 Programming the auxiliary heater
First read and observe the introductory information
and safety warnings Before programming, check that the date
and time set in the vehicle are correct .
The auxiliary heater can be program ...
Other materials:
Removing and installing metering pump -V54-, Golf and Golf Estate
Note
Pay attention to correct part number of metering pump -V54-
(different versions)
→ Electronic Parts Catalogue.
Removing
Note
Observe safety precautions for working on f ...
Checklist
Using seat belts :
Check the condition of all seat belts
regularly.
Keep the seat belts clean.
Never let any foreign bodies and liquids
get on to the seat belt, the latch plate or into the slot for the seat belt
buckle.
Do not trap or damage the seat belt and
latc ...
Adjusting glass panel
Special tools and workshop equipment
required
Height-adjustment of glass panel
Torque wrench -V.A.G 1783-
–
Loosen securing bolts for ...
