Volkswagen Golf Service & Repair Manual: Removing and installing metering pump -V54-, Golf and Golf Estate
 Note Note
| Pay attention to correct part number of metering pump -V54-
(different versions)
→ Electronic Parts Catalogue. |
Note
| Observe safety precautions for working on fuel supply system
→ Rep. gr.00. |
| Observe the rules for cleanliness when doing all work on the
fuel supply system
→ Chapter. |
| Always observe the safety precautions when working on the
fuel supply system
→ Chapter. |
| – |
Switch off electrical consumers. |
| – |
Switch off auxiliary/supplementary heater and switch off
ignition. |
The fuel system is pressurised.Danger of injury through fuel
spray.Always wear safety goggles.Always wear safety gloves.To release
pressure, wrap a clean cloth around the connection and carefully loosen
the connection.
| – |
Lower fuel tank until metering pump -V54- is accessible
→ Rep. gr.20. |
|
|
|
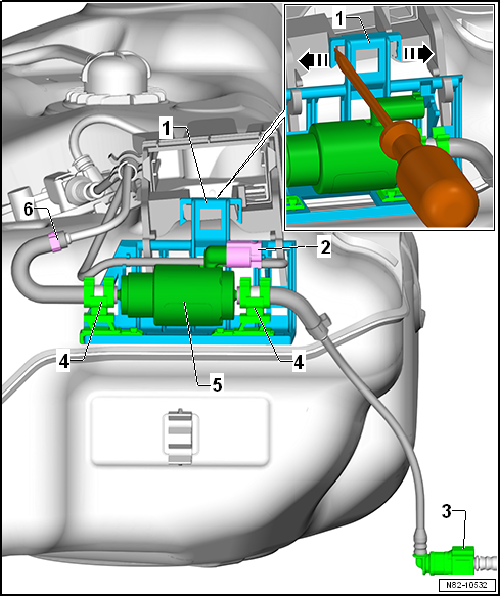
| – |
Press retaining tabs of bracket -1-
in -direction of arrow- to side,
using a suitable tool. |
| – |
Push up metering pump -V54--5-
with bracket -1- to remove upwards
from fuel tank. |
| – |
Separate connector -2- from
metering pump -V54--5-. |
| – |
Take metering pump -V54--5- out
of guides -4-. |
| – |
Release quick-release coupling of fuel line
-3-. Seal fuel lines. |
| – |
Open clip -6- and pull fuel
lines off metering pump -V54--5-.
Seal fuel lines. |
Note
| There are different types of the metering pump -V54-
→ Electronic Parts Catalogue. |
| Different versions; only metering pump -V54- with end
sealing valve permissible; pay attention to correct part number
→ Electronic Parts Catalogue |
|
|
|
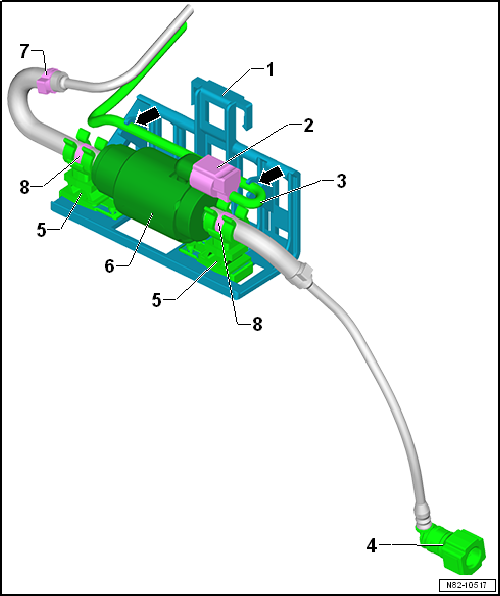
| Installation is carried out in the reverse order. When
installing, note the following: |
| – |
Renew bracket if retaining tabs -1-
and -5- are damaged or broken off. |
| – |
Insert metering pump -V54--6-
into bracket so that O-type clips -8-
are seated in guides -5- and
connector -2- does not make contact
with bracket. |
| – |
Engage electrical wire -3- in
guides -arrows-. |
| – |
Install bracket with metering pump -V54--6-
ensuring proper engagement of retaining tabs
-1-. |
| – |
Check that fuel lines are properly secured in retainers
-5-. |
Note
| If fuel lines make contact with body, they can transfer
sound. |
| – |
Check that fuel lines are correctly seated and routed; fuel
lines must not make contact with body (risk of transferring
sound). |
| → Chapter „Overview of fitting locations - fuel supply system“ |
| Fuel tank; Removing and installing fuel tank
→ Rep. gr.20. |
|
|
 |
Note
Check fuel delivery rate as described in “Guided Fault
Finding” function, vehicle diagnostic tester in “Guided Fault
Finding” mode.
...
Removing
Note
Pay attention to correct part number of metering pump -V54-
(different versions)
→ Electronic Par ...
Other materials:
Removing and installing high-pressure pipe
Special tools and workshop equipment
required
Torque wrench -V.A.G 1331-
Insert -T10395/3- from tool set -T10395 A-
...
Removing and installing rear senders
Removing
–
Remove rear wheel housing liner
→ General body repairs, exterior; Rep. gr.66.
–
Press both locking lugs in direction of arrow
...
Programming the auxiliary heater
First read and observe the introductory information
and safety warnings Before programming, check that the date
and time set in the vehicle are correct .
The auxiliary heater can be programmed via the Auxiliary heater menu in the infotainment
system.
Opening the Auxiliary heater menu ...
© 2016-2026 Copyright www.vwgolf.org

 Testing quantity of fuel delivered
 Removing and installing metering pump -V54-, Golf GTE