Volkswagen Golf Service & Repair Manual: Overview of fitting locations - components inside of front passenger
compartment, RHD vehicles
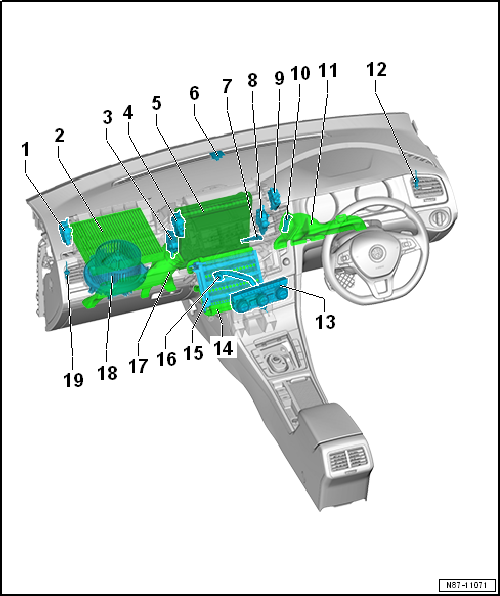
| 1 - |
Air recirculation flap control motor -V113- or fresh air/recirculated
air, air flow flap control motor -V425- |
| Removing and installing air recirculation flap control motor -V113-
→ Chapter |
| Removing and installing fresh air/recirculated air, air flow flap
control motor -V425-
→ Chapter. |
| Overview of fitting locations
→ Chapter |
| 2 - |
Dust and pollen filter |
| Removing and installing
→ Chapter. |
| 3 - |
Left temperature flap control motor -V158- or temperature flap
control motor -V68- |
| Removing and installing
→ Chapter. |
| Overview of fitting locations
→ Chapter |
| 4 - |
Front air distribution flap control motor -V426- with air
distribution flap control motor -V428- |
| Removing and installing
→ Chapter. |
| Overview of fitting locations
→ Chapter |
| Removing and installing
→ Chapter. |
| 6 - |
Sunlight penetration photosensor -G107- |
| Only on vehicles with Climatronic. |
| Removing and installing
→ Chapter. |
| 7 - |
Evaporator temperature sensor -G308- |
| Only on vehicles with air conditioning system |
| Checking: Use vehicle diagnostic tester in “Guided fault finding”
mode and → Current flow
diagrams, Electrical fault finding and Fitting locations |
| Removing and installing
→ Chapter. |
| 8 - |
Right temperature flap control motor -V159- |
| Only on vehicles with Climatronic. |
| Removing and installing
→ Chapter. |
| Overview of fitting locations
→ Chapter |
| 9 - |
Defroster flap control motor -V107- |
| Only on vehicles with Climatronic. |
| Removing and installing
→ Chapter. |
| Overview of fitting locations
→ Chapter |
| 10 - |
Footwell vent temperature sender -G192- |
| Only on vehicles with Climatronic. |
| Checking: Use vehicle diagnostic tester in “Guided fault finding”
mode and → Current flow
diagrams, Electrical fault finding and Fitting locations |
| Removing and installing
→ Chapter. |
| 11 - |
Footwell vent on driver side |
| Removing and installing
→ Chapter. |
| Assembly overview
→ Chapter |
| 12 - |
Right vent temperature sender -G151- |
| Only vehicles with Climatronic |
| Checking: Use vehicle diagnostic tester in “Guided fault finding”
mode and → Current flow
diagrams, Electrical fault finding and Fitting locations |
| Removing and installing
→ Chapter. |
| An incorrectly installed vent temperature sender will cause flow
noise |
| 13 - |
Operating and display unit |
| Removing and installing
→ Chapter. |
| Only on vehicles with air conditioning system |
| Removing and installing
→ Chapter. |
| 15 - |
Auxiliary air heater element -Z35- with auxiliary air heater control
unit -J604- |
| Removing and installing
→ Chapter. |
| 16 - |
Condensation drain hose |
| Only on vehicles with air conditioning system |
| Removing and installing
→ Chapter. |
| 17 - |
Footwell vent on front passenger side |
| Removing and installing
→ Chapter. |
| Assembly overview
→ Chapter |
| 18 - |
Fresh air blower -V2- |
| Removing and installing
→ Chapter. |
| 19 - |
Left vent temperature sender -G150- |
| Only vehicles with Climatronic |
| Checking: Use vehicle diagnostic tester in “Guided fault finding”
mode and → Current flow
diagrams, Electrical fault finding and Fitting locations |
| An incorrectly installed vent temperature sender will cause flow
noise |
| Removing and installing
→ Chapter. |
1 -
Left vent temperature sender -G150-
Only vehicles with Climatronic.
Checking: Use vehicle diagnostic tester in “Guided fault findingâ ...
Other materials:
Checking valve guides
Special tools and workshop equipment
required
Universal dial gauge bracket -VW 387-
Dial gauge -VAS 6079-
...
Assembly overview - wheel, PAX
1 -
Wheel
Fitting wheels
→ Chapter
2 -
Wheel bolts
Different versions
→ Chapter
3 -
PAX tyre
Identification markings on the tyre sidewall ...
Aquaplus design and multi-colour painting
Issue 05.14
To be able to execute fault-free design and multi-colour
paintwork with Aquaplus non-metallic, metallic and pearl effect
base paint, a number of special features need to be considered,
and some special aids deployed.
...
© 2016-2026 Copyright www.vwgolf.org


 Overview of fitting locations - components inside of front passenger
compartment, LHD vehicles
Overview of fitting locations - components inside of front passenger
compartment, LHD vehicles