Volkswagen Golf Service & Repair Manual: Overview of fitting locations - components inside of front passenger
compartment, LHD vehicles
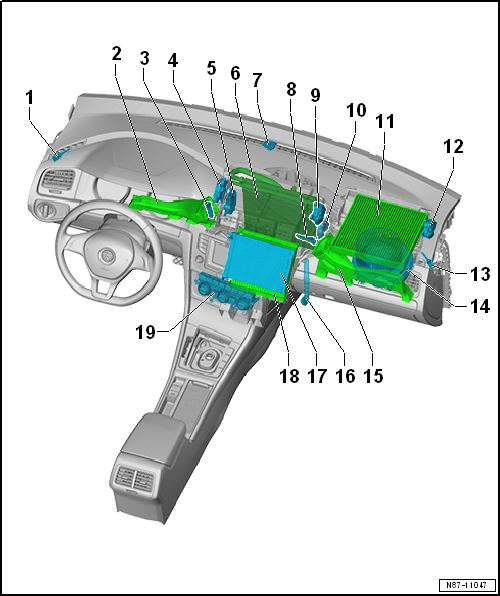
| 1 - |
Left vent temperature sender -G150- |
| Only vehicles with Climatronic. |
| Checking: Use vehicle diagnostic tester in “Guided fault finding”
mode and → Current flow
diagrams, Electrical fault finding and Fitting locations |
| An incorrectly installed vent temperature sender will cause flow
noise |
| Removing and installing
→ Chapter. |
| 2 - |
Footwell vent on driver side |
| Removing and installing
→ Chapter. |
| Assembly overview
→ Chapter. |
| 3 - |
Footwell vent temperature sender -G192- |
| Only on vehicles with Climatronic. |
| Checking: Use vehicle diagnostic tester in “Guided fault finding”
mode and → Current flow
diagrams, Electrical fault finding and Fitting locations |
| Removing and installing
→ Chapter |
| 4 - |
Front air distribution flap control motor -V426- with air
distribution flap control motor -V428- |
| Removing and installing
→ Chapter. |
| Overview of fitting locations
→ Chapter. |
| 5 - |
Left temperature flap control motor -V158- or temperature flap
control motor -V68- |
| Removing and installing
→ Chapter. |
| Overview of fitting locations
→ Chapter. |
| Only on vehicles with air conditioning system. |
| Removing and installing
→ Chapter. |
| 7 - |
Sunlight penetration photosensor -G107- |
| Only on vehicles with Climatronic. |
| Removing and installing
→ Chapter. |
| 8 - |
Evaporator temperature sensor -G308- |
| Only on vehicles with air conditioning system. |
| Checking: Use vehicle diagnostic tester in “Guided fault finding”
mode and → Current flow
diagrams, Electrical fault finding and Fitting locations |
| Removing and installing
→ Chapter. |
| 9 - |
Defroster flap control motor -V107- |
| Only on vehicles with Climatronic. |
| Removing and installing
→ Chapter. |
| Overview of fitting locations
→ Chapter. |
| 10 - |
Right temperature flap control motor -V159- |
| Only on vehicles with Climatronic. |
| Removing and installing
→ Chapter. |
| Overview of fitting locations
→ Chapter. |
| 11 - |
Dust and pollen filter |
| Removing and installing
→ Chapter. |
| 12 - |
Air recirculation flap control motor -V113- or fresh air/recirculated
air, air flow flap control motor -V425- |
| Removing and installing air recirculation flap control motor -V113-
→ Chapter |
| Removing and installing fresh air/recirculated air, air flow flap
control motor -V425-
→ Chapter. |
| Overview of fitting locations
→ Chapter. |
| 13 - |
Right vent temperature sender -G151- |
| Only vehicles with Climatronic. |
| Checking: Use vehicle diagnostic tester in “Guided fault finding”
mode and → Current flow
diagrams, Electrical fault finding and Fitting locations |
| Removing and installing
→ Chapter. |
| An incorrectly installed vent temperature sender will cause flow
noise |
| 14 - |
Fresh air blower -V2- |
| Removing and installing
→ Chapter. |
| 15 - |
Footwell vent on front passenger side |
| Removing and installing
→ Chapter. |
| Assembly overview
→ Chapter. |
| 16 - |
Condensation drain hose |
| Only on vehicles with air conditioning system. |
| Removing and installing
→ Chapter. |
| 17 - |
Auxiliary air heater element -Z35- with auxiliary air heater control
unit -J604- |
| Removing and installing
→ Chapter. |
| Removing and installing
→ Chapter. |
| 19 - |
Operating and display unit |
| Removing and installing
→ Chapter. |
1 -
Air recirculation flap control motor -V113- or fresh air/recirculated
air, air flow flap control motor -V425-
Removing and installing air recirculat ...
Other materials:
Checklist
Please note the following for the cleaning and maintenance of the
seat covers :
Before getting into the vehicle, close
all Velcro fasteners that could touch the cloth seat covers and fabric trims.
Open Velcro fasteners can cause damage to cloth seat covers and fabric trims.
...
Assembly overview - Lambda probe
Note
New lambda probes are coated with an assembly paste. This
paste must not get into the slots on the Lambda probe body.
In the case of a used Lambda probe grease only the thread
with high-temperature paste. This p ...
Wheel change, installation instructions for wheel change
WARNING
Perform the checks and follow the instructions
listed below. This is important to ensure that the wheel
bolts and the wheels are properly secured.
Note
...
© 2016-2026 Copyright www.vwgolf.org


 Overview of fitting locations - components inside of front passenger
compartment, RHD vehicles
Overview of fitting locations - components inside of front passenger
compartment, RHD vehicles