Volkswagen Golf Owners Manual: Opening or closing the electric panorama sliding/tilting roof
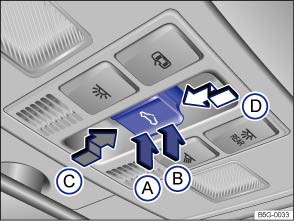
Fig. 40 In the headliner: button for the electric panorama sliding/tilting roof
 First read and observe the introductory information
and safety warnings
First read and observe the introductory information
and safety warnings The electric panorama sliding/tilting roof works when the ignition has been switched on. The electric panorama sliding/tilting roof can still be operated for a few minutes after the ignition has been switched off, provided that the driver door or front passenger door are not opened.
The  button has 2 positions. In the first position
the roof can be completely or partially tilted, opened or closed.
button has 2 positions. In the first position
the roof can be completely or partially tilted, opened or closed.
When set to position 2, the roof automatically returns to the final position when the button is pressed briefly. Press the button again to stop the one-touch function.
Tilting, opening and closing the panorama sliding/tilting roof
| Function | Action |
|---|---|
| Tilting the panorama sliding/tilting roof. | Push the rear area of the button Ⓑ to position 1. Push the button briefly to position 2 for the one-touch function. |
| Closing the tilted panorama sliding/tilting roof. | Push the front area of the button Ⓐ to position 1. Push the button briefly to position 2 for the one-touch function. |
| Stopping the one-touch function for the tilting/closing procedure. | Press the button again at position Ⓐ or Ⓑ. |
| Opening the panorama sliding/tilting roof. | Push the button Ⓒ rearwards to position 1. Push the button briefly to position 2 to open the roof to the convenience position using the one-touch function. |
| Closing the panorama sliding/tilting roof. | Push the button Ⓓ forwards to position 1. Push the button briefly to position 2 for the one-touch function. |
| Stopping the one-touch function for the opening or closing procedure. | Press the button again at Ⓒ or Ⓓ. |
Opening and closing the sliding headliner
Use the handle at the front near the roof opening to move the sliding headliner to the required position.
 Introduction
This chapter contains information on the following subjects:
→ Opening or closing the electric panorama sliding/tilting roof
→ Function of the electric panorama sliding/tilting ...
 Function of the electric panorama sliding/tilting roof
First read and observe the introductory information
and safety warnings Convenience opening and closing
The electric panorama sliding/tilting roof can be opened and closed from the
outside with ...
Other materials:
Removing and installing tyre pressure sensor, tyre pressure sensor with
valve
Removing
–
Unscrew union nut -1-.
–
Remove tyre pressure sensor-2-
from bed of wheel rim.
Installing
...
General safety regulations
To prevent personal injury and material damage to the
vehicle, observe the following:
WARNING
Risk of injury and accident by accidental engagement
of gear while engine is running.
...
Removing and installing number plate light -X4-/-X5-
Note
If an LED number plate light is faulty, the entire number
plate light must be renewed.
Removing
–
Turn light switch to “0” position.
...
