Volkswagen Golf Service & Repair Manual: Removing and installing tyre pressure sensor, tyre pressure sensor with
valve
| – |
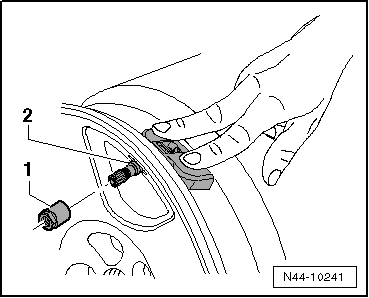
Remove tyre pressure sensor-2-
from bed of wheel rim. |
 Caution
| Before installing tyre pressure sensor, clean valve
hole. |
|
|
|
|
| – |
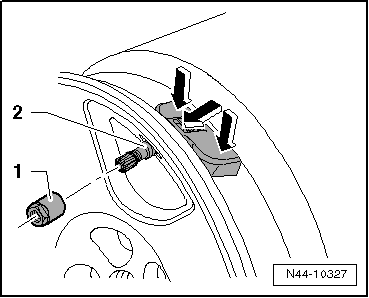
Install tyre pressure sensor-2-
along with a new seal and sealing washer and push it into wheel
rim at the points marked by -arrows-. |
| – |
Press tyre pressure sensor-2-
into the wheel rim at the points marked by
-arrows-. |
| Screw union nut -1- onto tyre
pressure sensor from outside. |
|
|
|
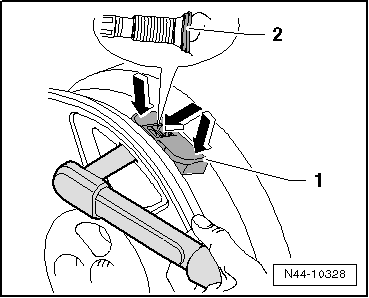
| – |
Press tyre pressure sensor-1-
onto bed of rim at the points marked by
-arrows- and tighten union nut to 8 Nm. |
Caution
| Tighten nut only to specified torque. |
| The sealing washer -2-
will be deformed slightly when tightened. |
| The sealing washer may be installed only once.
Install a new sealing washer with rubber seal every time
the part is fitted. |
| Further tightening of the union nut is not permitted
because the seal may be damaged, leading to leaks. |
|
| → Chapter „Assembly overview - tyre pressure sensor, tyre
pressure sensor with valve“ |
|
|
|
Special tools and workshop equipment
required
Torque wrench -V.A.G 1410-
Ca ...
© 2016-2026 Copyright www.vwgolf.org


 Removing and installing tyre pressure sensor, tyre pressure sensor without
valve, customer service version
Removing and installing tyre pressure sensor, tyre pressure sensor without
valve, customer service version