Volkswagen Golf Owners Manual: Locking and unlocking the vehicle from the outside
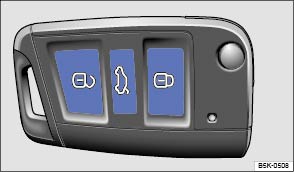
Fig. 27 Buttons on the vehicle key
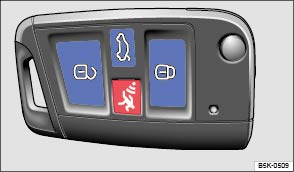
Fig. 28 Vehicle key with alarm button
 First read and observe the introductory information
and safety warnings
First read and observe the introductory information
and safety warnings | Function | Buttons to be used on the vehicle key or |
|---|---|
| Unlocking the vehicle. | Press the  button. Press and hold
for convenience opening. button. Press and hold
for convenience opening. |
| Locking the vehicle. | Press the  button. Press and
hold for convenience closing. In vehicles with a SAFELOCK mechanism, press
the button once to lock the vehicle
using the SAFELOCK mechanism. Press the
button twice to lock the vehicle without the SAFELOCK mechanism. button. Press and
hold for convenience closing. In vehicles with a SAFELOCK mechanism, press
the button once to lock the vehicle
using the SAFELOCK mechanism. Press the
button twice to lock the vehicle without the SAFELOCK mechanism.
|
| Unlocking the tailgate. | Press the  button . button . |
Please note: depending on the central locking function that
has been set in the infotainment system, all of the doors and the tailgate may only
be unlocked when the button is pressed twice .
The vehicle key will lock or unlock the vehicle only when the battery has enough power and the key is located within a few metres of the vehicle.
- When the vehicle is locked, all turn signals will flash once as confirmation.
- When the vehicle is unlocked, all turn signals will flash twice as confirmation.
If the turn signals do not flash as confirmation, at least one of the doors or the tailgate is not closed.
The vehicle cannot be locked using the vehicle key if the driver door is still open. The vehicle will lock again automatically within a few seconds of being unlocked if you do not open one of the doors or the tailgate. This function prevents the vehicle from remaining unlocked if the unlocking button is pressed by mistake.
Convenience opening and closing
- See electric windows – functions .
- See function of the electric panorama sliding/tilting roof .
 Description of the central locking system
First read and observe the introductory information
and safety warnings The central locking system enables you to lock and unlock
all the doors, the tailgate and tank flap from one central point ...
 Locking and unlocking the vehicle from the inside
Fig. 29 In the driver door: central locking
button
First read and observe the introductory information
and safety warnings
Press the
button :
...
Other materials:
Schematic diagram - coolant hoses, Golf GTE
Note
Currently, only the auxiliary heater function is available.
At the moment the auxiliary heater is not intended to be
operated as a supplementary heater. In vehicles with a
high-voltage system, the high-voltage heater (PTC) -Z115- is
...
Switching over headlights for driving abroad (travel mode)
First read and observe the introductory information
and safety warnings If you have to drive a right-hand drive vehicle in a
left-hand drive country, or vice versa, the asymmetric dipped beam headlights may
dazzle oncoming traffic with xenon headlights. Therefore, the headlights must be
sw ...
Loading the trailer
First read and observe the introductory information
and safety warnings Trailer weight and drawbar load
The trailer weight is the weight that the vehicle can pull . The drawbar load
is the weight that the towing bracket exerts on the ball coupling vertically from
above .
The figure ...
