Volkswagen Golf Owners Manual: Fuses in the vehicle
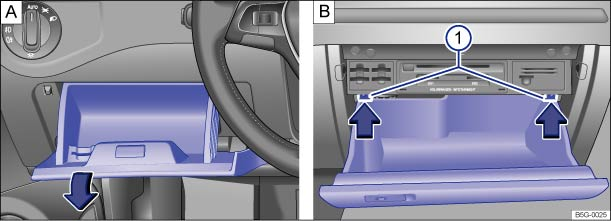
Fig. 228 Fuse box cover in the dash panel: A: left-hand drive vehicle, to the left-hand side of the steering wheel B: right-hand drive vehicle, on the driver side
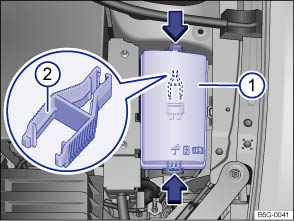
Fig. 229 In the engine compartment: cover ① of fuse box with plastic pliers ②
 First read and observe the introductory information
and safety warnings
First read and observe the introductory information
and safety warningsFuses must always be replaced by a new fuse with the same amp rating (same colour and markings) and size.
Fuse designs
- Standard flat blade fuse (ATO®).
- Small flat blade fuse (MINI®).
- JCASE® fuse.
Colour coding of fuses
| Colour | Amp rating in ampere (ATO® / MINI®) | Amp rating in ampere (JCASE®) |
|---|---|---|
| Black | 1 | |
| Light brown | 5 | |
| Brown | 7.5 | |
| Red | 10 | 50 |
| Blue | 15 | 20 |
| Yellow | 20 | 60 |
| White or clear | 25 | |
| Green | 30 | 40 |
| Orange | 40 | |
| pink | 30 | 30 |
Left-hand drive: opening the fuse box in the dash panel
- Open the stowage compartment on the driver side and pull the left side forcefully in the direction of the arrow A. You may need to use some force to do this.
- To install, press the stowage compartment into the mounts on the dash panel until it audibly clicks into place on both sides.
Right-hand drive: opening the fuse box in the dash panel
- Open the stowage compartment on the front passenger side B.
- Empty stowage compartment if necessary.
- Push the catches ① up in the direction of the arrow while opening stowage compartment until the fuse carrier can be accessed.
- To install, carefully push the stowage compartment forwards beyond the resistance of the catches ①.
Opening the fuse box in the engine compartment
- Open the bonnet
 .
.
- Press the release buttons in the direction of the arrow to release the fuse box cover.
- Lift off the cover.
- To install, position the cover on the fuse box and press it downwards until the cover audibly clicks into place on both sides.
In some vehicles, a pair of plastic pliers for removing fuses is located on the inside of the cover of the fuse box in the engine compartment.

 NOTICE
- Remove the covers for the fuse boxes carefully and install them again properly so as to avoid damage to the vehicle.
- Fuse boxes must be protected from dirt and moisture when opened. Dirt and moisture in the fuse boxes can damage the electrical system.

This chapter does not refer to all the fuses located in the vehicle. These should be changed only by a qualified workshop.
 Introduction
This chapter contains information on the following subjects:
→ Fuses in the vehicle
→ Fuse table
→ Fuse tables for fuses in the engine compartment
→ Changing a bl ...
 Fuse table
Fig. 230 In the dash panel: fuse layout
First read and observe the introductory information
and safety warningsThe table shows the fuse locations for the items of electrical
equipment which are ...
Other materials:
Vehicle path display
Fig. 152 Vehicle path display without steering
input (colour display)
Fig. 153 Vehicle path display with steering
input (colour display)
First read and observe the introductory information
and safety warnings
Key
and
Meaning
...
Removing and installing dash panel
Special tools and workshop equipment
required
Torque wrench -V.A.G 1783-
Removing
–
Remove centre console
→ Chapter.
...
Removing and installing front air distribution flap actuation unit, heater
and air conditioning system with electric/manual controls, LHD vehicles
Removing
–
Remove dash panel
→ General body repairs, interior; Rep. gr.70.
–
Remove the air duct for the defroster vent
→ Chapter.
–
...
