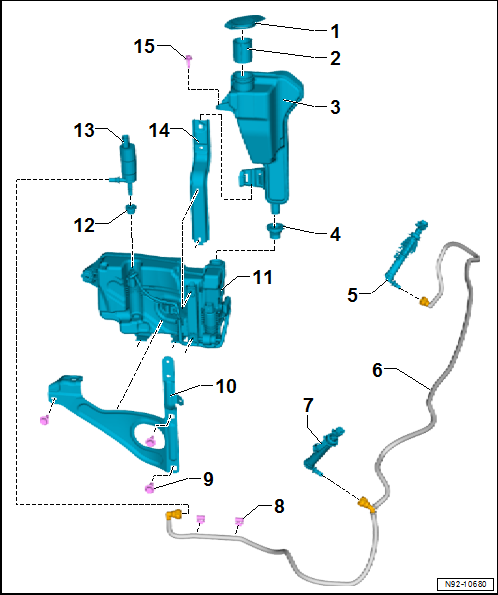
Volkswagen Golf Service & Repair Manual: Assembly overview – headlight washer system, »R«
| 3 - |
Washer fluid reservoir, upper part |
| Washer fluid reservoir, 2-part version |
| Removing and installing
→ Chapter |
| Between upper and lower parts of washer fluid reservoir |
| Insert in lower part of washer fluid reservoir |
| Moisten seal with suitable lubricant before connecting upper and
lower parts of washer fluid reservoir |
| Removing and installing
→ Chapter |
| Removing and installing
→ Chapter |
| Clipped into washer fluid reservoir |
| Bracket for lower part of washer fluid reservoir |
| Removing and installing
→ Chapter |
| 11 - |
Washer fluid reservoir, lower part |
| Washer fluid reservoir, 2-part version |
| With windscreen washer fluid level sender -G33- |
| Removing and installing
→ Chapter |
| 13 - |
Headlight washer system pump -V11- |
| Removing and installing
→ Chapter |
| Bracket for upper part of washer fluid reservoir |
| Removing and installing
→ Chapter |
Removing and installing washer fluid reservoir
 Note Note
| The washer fluid reservoir (which is the same for the window
and the headlight washer systems) is located in the front left
wheel housing. |
| – |
Removing and installing washer fluid reservoir
→ Chapter. |
|
| Removing and installing washer fluid
reservoir, »R« |
Note
| The washer fluid reservoir (which is the same for the window
and the headlight washer systems) is located in the front right
wheel housing. |
| – |
Removing and installing washer fluid reservoir
→ Chapter. |
|
|
|
1 -
Headlight washer system pump -V11-
Removing and installing
→ Chapter
2 -
Sealing grommet
Rene ...
Special tools and workshop equipment
required
Drip tray
Removing
–
Remove noise ins ...
© 2016-2026 Copyright www.vwgolf.org


 Assembly overview - headlight washer system
 Removing and installing headlight washer system pump -V11-