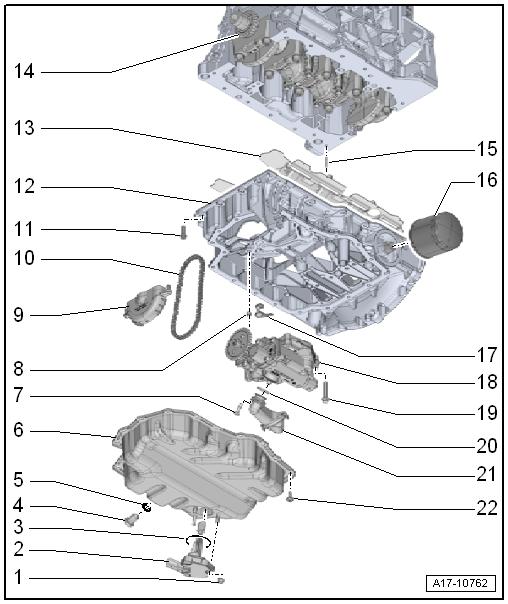
Volkswagen Golf Service & Repair Manual: Assembly overview - sump and oil pump
 Note
Note
| Metal shavings or a large quantity of small metal particles found
during engine repair could indicate that the crankshaft bearings or
conrod bearings are damaged. To avoid any subsequent damage, the
following work must be carried out following the repair: Carefully clean
oil channels and renew oil spray jets, engine oil cooler and oil filter. |
| Removing and installing oil spray jets
→ Chapter. |
| 2 - |
Oil level and oil temperature sender -G266- |
| Removing and installing
→ Chapter |
Note
| The oil drain plug only has to be replaced if it has a permanent
seal. |
| Removing and installing
→ Chapter |
| For oil pump drive sprocket |
| Before removing, mark running direction with paint. |
| Specified torque and tightening sequence
→ Fig. |
| Removing and installing
→ Chapter |
| Remove and install with oil filter tool -3417-. |
| Before installing, lightly coat seal with clean engine oil. |
| Removing and installing
→ Chapter |
| Tightening sequence → Fig. |
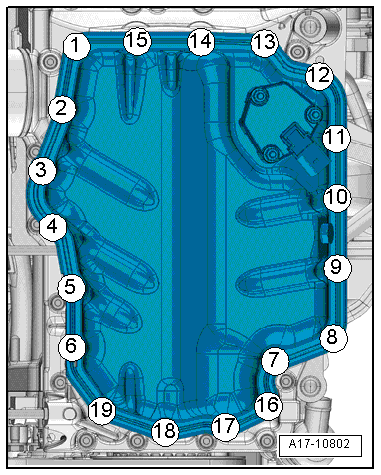
| Lower part of sump - specified torque and tightening
sequence |
| – |
Tighten bolts in stages in the sequence shown: |
|
|
|
| Stage |
Bolts |
Specified torque |
| 1 |
-1 … 19- |
Screw in to contact by hand |
| 2 |
-1 … 19- |
12 Nm |
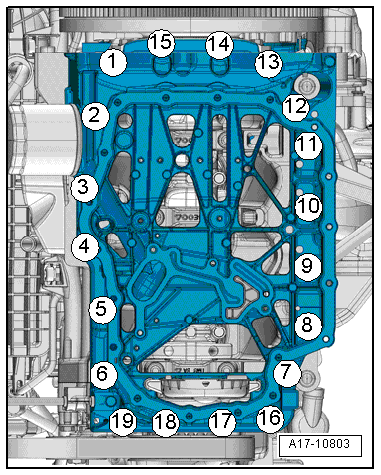
| Upper part of sump - specified torque and tightening
sequence |
Note
| Renew bolts that are tightened with specified tightening
angle. |
| – |
Tighten bolts in stages in the sequence shown: |
|
|
|
| Stage |
Bolts |
Specified torque/
additional specified angle |
| 1 |
-1 … 19- |
Screw in to contact by
hand |
| 1 |
-1 … 19- |
8 Nm |
| 2 |
-1 … 19- |
Turn 90° further |
Removing
–
Drain off engine oil.
–
Disconnect electrical connect ...
© 2016-2026 Copyright www.vwgolf.org

 Sump, oil pump
 Removing and installing oil level and oil temperature sender -G266-