Volkswagen Golf Service & Repair Manual: Removing and installing trim panel
 Note
Note
-
| |
Removal and installation are described for the trim panel on
driver side. Follow same instructions for the front passenger side
as appropriate. |
-
| |
Removal and installation are illustrated for 4-door vehicles.
Removal and installation on 2-door vehicles are analogous. |
| – |
Remove front door trim
→ Chapter. |
| – |
Remove exterior mirror adjuster -EX11- with driver side interior
locking button for central locking system -E308-
→ Electrical system; Rep. gr.96. |
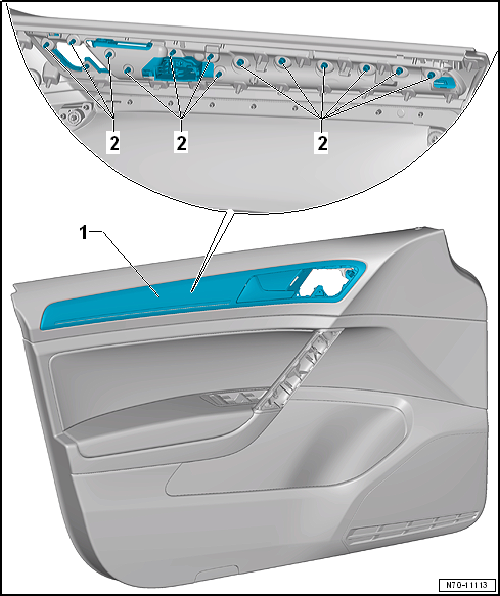
| – |
Using an appropriate drill bit, drill mounting points
-2- of trim panel -1-
off door trim, but just until trim panel starts to detach from door
trim. |
 Caution Caution
| The door trim must not be damaged when drilling. |
|
| – |
Carefully release mounting points -2-
one after the other and remove trim panel -1-
from door trim. |
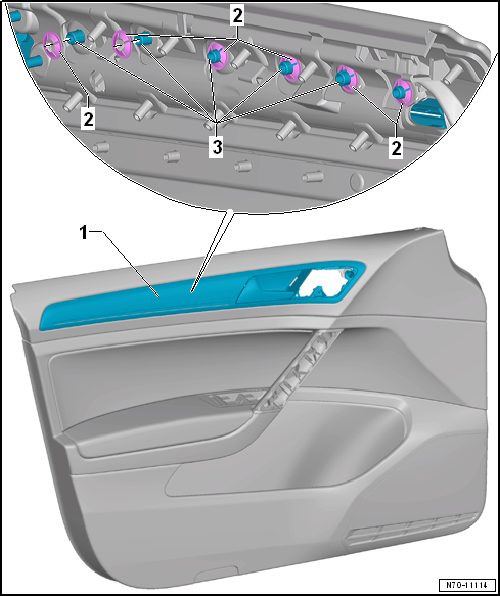
| Clamping washers near trim strip (4-door models): qty. 6,
17 mm Ч 7.5 mm. Allocation
→ Electronic Parts Catalogue. |
| Clamping washers near trim strip (2-door models): qty. 9,
17 mm Ч 7.5 mm. Allocation
→ Electronic Parts Catalogue |
| Clamping washers near inner door handle: qty. 8,
13.4 mm Ч 6 mm. Allocation
→ Electronic Parts Catalogue |
|
|
|
| – |
Insert new trim panel -1- into door
trim. |
| – |
Press clamping washers -2- as far as
stop onto pins -3- of trim panel. |
| – |
Press remaining clamping washers onto pins of trim panel near inner
door handle as described. |
| – |
Cut back pins -3- of trim panel above
clamping washers -2- to max. 2 mm beyond
washers. |
| – |
Install exterior mirror adjuster -EX11- with driver side interior
locking button for central locking system -E308-
→ Electrical system; Rep. gr.96. |
| – |
Install front door trim
→ Chapter. |
Note
Removal and installation are described for the front
door trim on driver side. Follow same instructions for the
front ...
Note
Removal and installation are described for the mirror
cover trim on driver side. Follow same instructions for the
fron ...
Other materials:
1-pack anti-corrosion wash primer
Designation:
1-pack anti-corrosion wash primer -ALN 002 003 10-
Issued 06/2011
Product description
1-pack anti-corrosion primer is a zinc chromate-free
one-pack produc ...
Function of air quality sensor -G238-
The air quality sensor detects noxious substances in the
ambient air (primarily petrol and/or diesel fumes).
The Climatronic control unit -J255- evaluates the signal
from the air quality sensor -G238-. The air conditioning system
i ...
Assembly overview - knee airbag
1 -
Knee airbag with driver side knee airbag igniter -N295-.
Removing and installing
→ Chapter
Caution
Any risk of damage to the knee airbag surface due to
mechanical stress must ...
© 2016-2026 Copyright www.vwgolf.org

 Removing and installing front door trim
 Removing and installing mirror cover trim