Volkswagen Golf Service & Repair Manual: Assembly overview - fuel delivery unit/fuel gauge sender, vehicles with
four-wheel drive
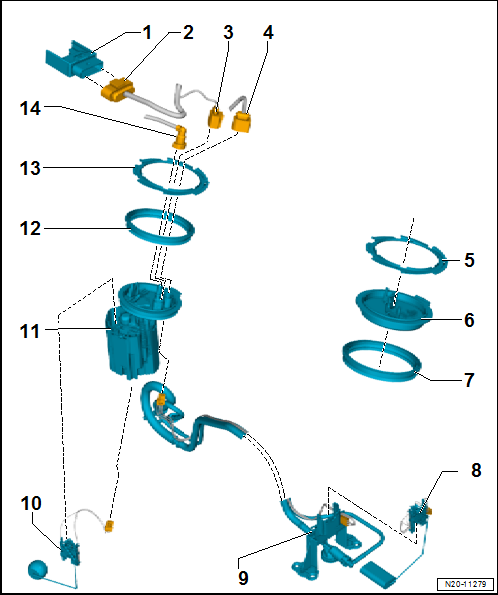
| 1 - |
Fuel pump control unit -J538- |
| Check with → Vehicle
diagnostic tester |
| Removing and installing
→ Chapter |
| For fuel pump control unit -J538-. |
| Make sure it is engaged properly; pull to check that plug-in
connector is correctly engaged |
| For fuel system pressurisation pump -G6-. |
| Make sure it is engaged properly; pull to check that plug-in
connector is correctly engaged |
| For fuel gauge sender -G- and fuel gauge sender 2 -G169- |
| Make sure it is engaged properly; pull to check that plug-in
connector is correctly engaged |
| Loosen and tighten with wrench -T10202-. |
| Removing and installing
→ Chapter |
| 8 - |
Fuel gauge sender 2 -G169- |
| Carry out electrical test → Vehicle
diagnostic tester |
| Removing and installing
→ Chapter |
| 9 - |
Mounting with suction-jet pump |
| No replacement part available |
| 10 - |
Fuel gauge sender -G- |
| Carry out electrical test → Vehicle
diagnostic tester |
| With fuel system pressurisation pump -G6-. |
| With integrated fuel filter |
| The fuel filter cannot be renewed individually |
| Carry out electrical test on fuel pump with → Vehicle
diagnostic tester |
| After installing, fill vehicle with at least 5 litres of fuel. |
| Removing and installing
→ Chapter |
| Remove and tighten with wrench -T10202-. |
| To disconnect from flange, press release tab on connection piece |
| Connect so it engages audibly |
| Press in again and then pull to check that plug-in connector is
correctly engaged |
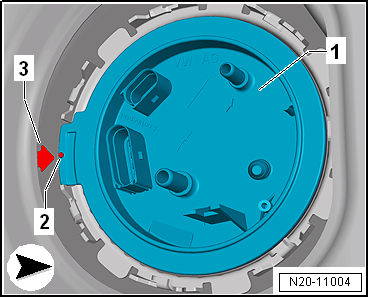
| Installation position of fuel delivery unit |
| The arrow -3- on the fuel tank
must line up with the mark -2- on
the sealing flange -1-. |
|
|
|
1 -
Fuel delivery unit
With fuel system pressurisation pump -G6-.
With integrated fuel filter; cannot be renewed individually.
...
1 -
Fuel delivery unit
With fuel system pressurisation pump -G6-.
With integrated fuel filter; fuel filter cannot be renewed
separately ...
© 2016-2026 Copyright www.vwgolf.org

 Assembly overview - fuel delivery unit/fuel gauge sender, vehicles with
front-wheel drive
Assembly overview - fuel delivery unit/fuel gauge sender, vehicles with
front-wheel drive Assembly overview - fuel delivery unit/fuel gauge sender, vehicles with
auxiliary heater
Assembly overview - fuel delivery unit/fuel gauge sender, vehicles with
auxiliary heater