Volkswagen Golf Service & Repair Manual: Assembly overview - camshaft housing, engine codes CHPA, CMBA, CPVA, CXSA, CZCA, CPVB, CZDA
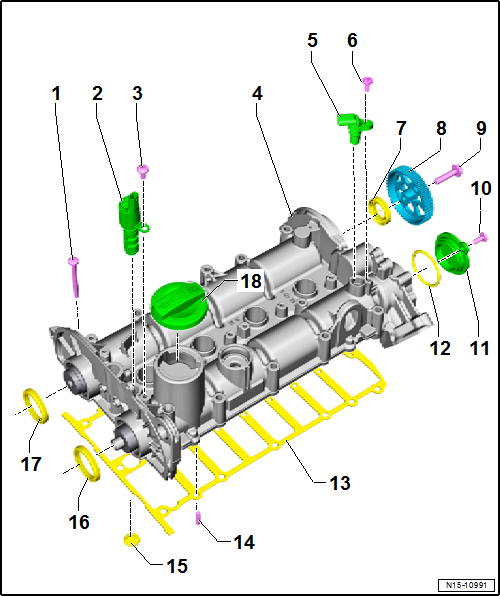
| 1 - | Bolt |
| Specified torque and tightening sequence → Fig. |
| 2 - | Inlet camshaft control valve 1 -N205- |
| Removing and installing → Chapter |
| 3 - | Bolt |
| 8 Nm |
| 4 - | Camshaft housing |
| Removing and installing → Chapter |
| 5 - | Hall sender -G40- |
| Removing and installing → Chapter |
| 6 - | Bolt |
| 8 Nm |
| 7 - | Seal |
| For exhaust camshaft, gearbox end |
| Renew → Chapter |
| 8 - | Toothed belt pulley |
| For coolant pump. |
| Removing and installing → Chapter |
| 9 - | Bolt |
| Specified torque → Item |
| 10 - | Bolt |
| 8 Nm |
| 11 - | Cap |
| 12 - | O-ring |
| Renew |
| 13 - | Gasket |
| Renew |
| 14 - | Dowel pin |
| 15 - | Gasket |
| With oil strainer |
| Inserted into cylinder head |
 Note
Note| The oil strainer is fitted only if the cylinder head has the appropriate recess. |
| Cylinder heads with recess do not require an oil strainer. |
| 16 - | Seal |
| For inlet camshaft. |
| Renew → Chapter |
| 17 - | Seal |
| For exhaust camshaft (pulley end) |
| Renew → Chapter |
| 18 - | Cap |
Note
|
|
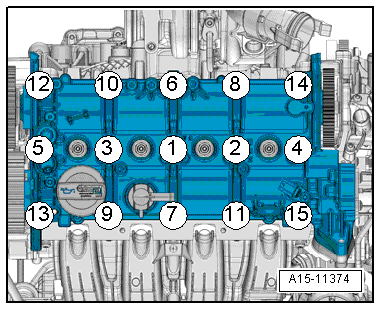
| Stage | Bolts | Specified torque/ additional specified angle |
| 1 | -1 … 15- | 10 Nm |
| 2 | -1 … 15- | Turn 180° further |
 Assembly overview - cylinder head
Note
The camshafts must not be removed individually.
In the event of repair, the camshaft housing must be renewed
complete ...
 Removing and installing cylinder head
Special tools and workshop equipment
required
Socket -3410-
Removing
...
Other materials:
Separating and connecting Bowden cable for remote release mechanism for seat
backrest
Note
The separating and connecting procedures are described for
the left side of the vehicle. The separating and connecting
procedures on the right side are analogous.
Detaching
...
Removing and installing luggage compartment cover
Removing
–
Open luggage compartment cover -1-
completely.
–
Fold down rear seat backrests.
–
Push luggage compartment cover -1-
in -direction of arrow A-.
...
Assembly overview - standard wheel
1 -
Wheel
Fitting wheels
→ Chapter
2 -
Wheel bolts
Different versions
→ Chapter
3 -
Tyres
→ Chapter „Information on tyres“
...
