Volkswagen Golf Service & Repair Manual: Assembly overview - brake caliper FS III
| When carrying out repairs, install all parts supplied in repair kit. |
| Use only methylated spirits for cleaning the brake. |
| Apply thin coat of lithium grease -G 052 150 A2- to brake cylinder,
piston and seal. |
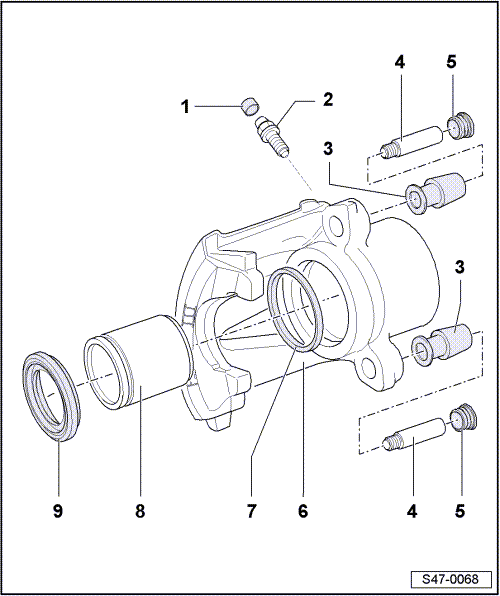
| Before screwing in, grease thread with thin coat of lithium grease
-G 052 150 A2- |
| Insert into brake caliper. |
| Insert into sleeve bearing. |
| Removing and installing
→ Chapter |
| Apply thin coat of assembly paste G 052 150 A2 to piston before
installing. |
| Removing and installing
→ Chapter |
| Removing and installing
→ Chapter |
| When inserting piston, take care not to damage protective cap |
When carrying out repairs, install all parts supplied in repair kit.
Use only methylated spirits for cleaning the brake.
Apply thin coat of lithium grease -G 0 ...
Other materials:
Technical data
General repair instructions
Repairing electrical wiring harnesses and connectors
→ Electrical System, General Information; Rep. gr.97
Releasing and dismantling connector housings
→ Electrical Sys ...
Engine cooling
Since higher demands are placed on the engine cooling system
when a trailer is being towed, the cooling system is uprated in
conjunction with factory fitted towing attachments if this is a
technical necessity. This is carried out, for example, by
install ...
General information
Repair instructions for repair work on ABS
The ABS brake system is divided diagonally. The
servo-assistance is effected pneumatically by the vacuum brake
servo unit.
Vehicles with ABS are not fitted with a mechanical bra ...
© 2016-2026 Copyright www.vwgolf.org



 Assembly overview - brake caliper (PC57 brakes)