Volkswagen Golf Service & Repair Manual: Removing and installing rear window
 Note
| |
The removal of a bonded window is described using the
Removal kit for flush bonded windows -V.A.G 1474 A-. |
| |
Alternatively, you can also use the cutting tool for bonded
windows -VAS 6452-. |
| |
Another alternative is to use the window removal set -VAS
6888-. |
| Special tools and workshop equipment
required |
| |
Removal kit for flush bonded windows -V.A.G 1474 A- or
Removal kit for flush bonded windows -VAS 6452- |
| |
Suction lifter -V.A.G 1344- |
| |
Cutting tool -V.A.G 1351- |
| |
Windscreen removal kit -V.A.G 1755- |
| |
Cartridge gun -V.A.G 1628- |
|
|
|
|
|
|
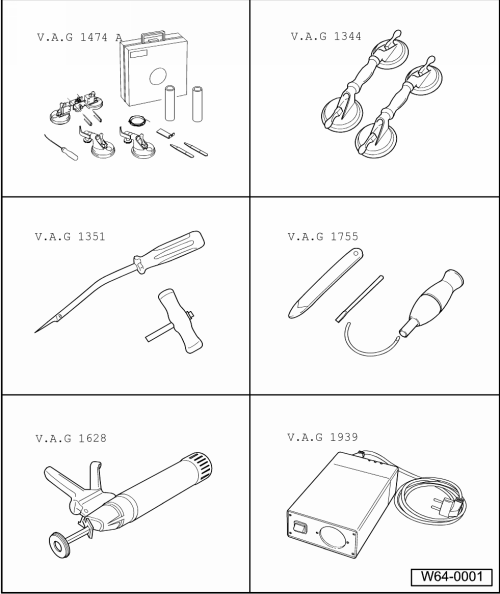
Cartridge heater -V.A.G 1939- |
Note
| If the rear window is reused, make sure that the electrical
connections for the rear window heating are not damaged. |
| – |
If the vehicle is equipped with a roof spoiler or a side spoiler on
the rear window, the spoilers must be removed first. |
| – |
Remove roof spoiler
→ Chapter; remove side spoilers
→ Chapter. |
| – |
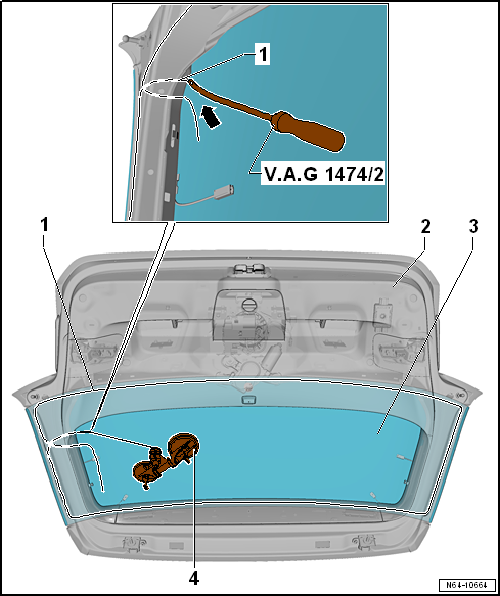
Pull off connectors for rear window heating and window aerial. |
| – |
Using the awl -V.A.G 1474/2- pull cutting cord
-1- through the adhesive sealant inwards at the location
-arrow- shown in the illustration. |
| – |
Secure end of cutting cord using pull handle -V.A.G 1351/1- to
prevent it from falling out. |
| – |
Lay cutting cord around rear window and guide second end of cord
inwards. |
| – |
Attach the end of the cutting cord on the removal kit for flush
bonded windows -VAS 6452- or the reel device -V.A.G 1654 A-. |
Note
| It is essential to use the protective film or the plastic strip -V.A.G
1474/15- in order to protect the metal flange. |

| – |
Carefully guide protective film -4- or
plastic strip -V.A.G 1474/15- between rear window and metal flange. |
| – |
Place reel device -V.A.G 1654 A- in indicated position. |
| – |
Turn reel device -V.A.G 1654 A- accordingly and cut rear window free
towards sides starting in upper area. |
| – |
Use wedge -V.A.G 1474/5- to press cutting cord
-3- against rear window glass while cutting in order to have
clearance at body flange. |
| – |
Then cut rear window free in lower area. |
| – |
Hold rear window on 2 suction lifters while cutting free.
|
 Caution Caution
| In the lower area of the rear window greater force may need
to be applied, since 2 adhesive beads must be cut. |
|
| – |
Pull rear window off rear lid using the 2 suction lifters. |
| – |
Preparing old undamaged window for glazing
→ Chapter. |
| – |
Preparing new window for glazing
→ Chapter. |
| – |
Preparing body flange for glazing
→ Chapter. |
| – |
Installation instructions
→ Chapter |
| – |
Minimum curing period
→ Chapter |
| – |
Install roof spoiler
→ Chapter; install new side spoilers
→ Chapter. |
|
|
|
1 -
Rear window
Removing and installing
→ Chapter
2 -
PUR adhesive sealant
Cross section of bead: -width b- = 7 ...
–
Protect body and interior from glass splinters.
–
Remove pieces of glass up to adhesive sealing material.
–&nbs ...
Other materials:
Introduction
This chapter contains information on the following subjects:
→ Indicator lamp
→ Windscreen wiper lever
→ Windscreen wiper functions
→ Service position for the front windscreen wipers
→ Rain sensor
→ Checking and refilling t ...
Wiring open circuit with two repair positions
Repair position with interlinked wire.
–
Place the wire to be repaired to the side at two points
(about 20 cm to both sides of the relevant repair position).
–
If necessary, unbind the wiring harnes ...
Assembly overview - fire extinguisher
1 -
Bracket
Removing
–
Remove bracket -4-.
–
Remove seat cover and padding from seat pan
→ Chapter.
WARNING
Risk of eye injury.
Wear ey ...
© 2016-2026 Copyright www.vwgolf.org

 Assembly overview - rear window
 Removing broken rear window