Volkswagen Golf Service & Repair Manual: Assembly overview - auxiliary heater, interior
| Removing and installing
→ Chapter. |
| Must be renewed after every opening. |
| Removing and installing
→ Chapter. |
| 5 - |
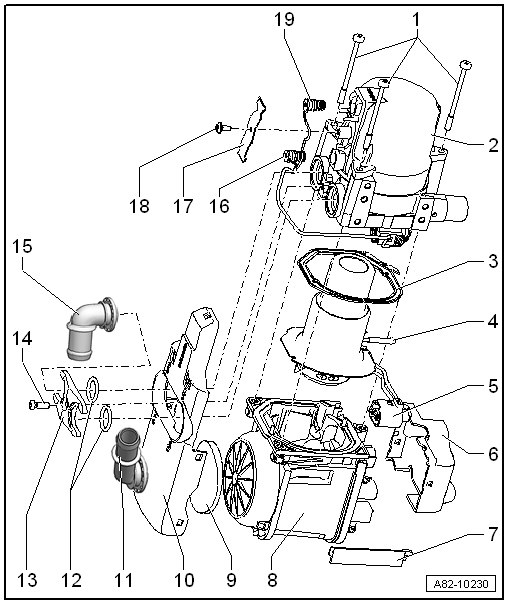
Glow plug with flame monitoring -Q8- |
| Removing and installing
→ Chapter. |
| 6 - |
Cover for auxiliary heater control unit -J364-. |
| Removing and installing
→ Chapter. |
| 8 - |
Auxiliary heater control unit -J364- with combustion air blower -V6- |
 Note
Note
| The auxiliary heater control unit -J364- and the combustion air
blower -V6- with housing form one component and cannot be dismantled.
The reason is the seal between the auxiliary heater control unit -J364-
and the housing. |
| Removing and installing
→ Chapter. |
| Mark installation position before detaching |
| Mark installation position before detaching |
| 16 - |
Temperature sensor -G18- |
| Removing and installing
→ Chapter. |
| 19 - |
Overheating sensor -G189- |
| Removing and installing
→ Chapter. |
1 -
Auxiliary heater
2 -
Clamping piece
3 -
Coolant hose
4 -
Air intake silencer
...
Special tools and workshop equipment
required
Torque wrench -V.A.G 1410- (4…20 Nm)
...
Other materials:
Preparing new windows for installing
Note
The area on which the adhesive bead is applied is not
precoated or primed.
The sealing lip is included with a new windscreen.
No win ...
Parking using the Park Assist system
Fig. 158 Parking space detected. A: parallel
parking, B: perpendicular parking
Fig. 159 In the lower section of the centre
console: button for switching on the Park Assist system manually
First read and observe the introductory information
and safety warnings Preparation for parking
...
Adjusting striker pin
Special tools and workshop equipment
required
Torque wrench -V.A.G 1331-
Note
Threaded plate -1- of striker pin is
secured in pillar using a method which differs f ...
© 2016-2026 Copyright www.vwgolf.org

 Assembly overview - auxiliary heater attachments
 Removing and installing auxiliary heater