Volkswagen Golf Service & Repair Manual: Removing and installing vacuum sender -G608
 Note Note
| The vacuum sender -G608- is only installed in selected
petrol engines. |
|
|
|
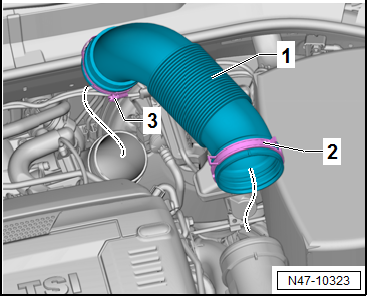
| – |
Open clamp -2- and screw-type
clip -3-. |
| – |
Remove air ducting hose -1-. |
|
|
|
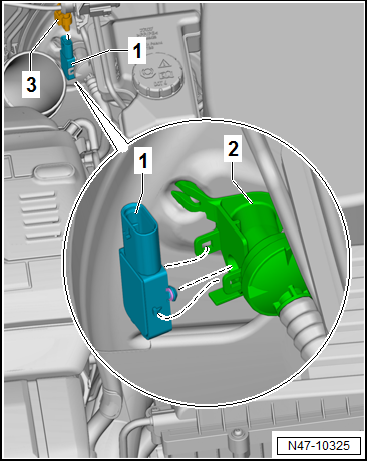
| Continuation for all models: |
| – |
Disconnect connector -3- from
vacuum sender -G608--1-. |
| – |
Unclip vacuum sender -G608--1-
from vacuum line -2-. |
| Install in reverse order of removal, observing the
following: |
Note
| Make sure to check the seal for damage before installing the
vacuum sender -G608-. |
| If the seal is damaged, the vacuum sender must be renewed. |
|
|
|
Vacuum pump for brake servo, diesel
vehicles
Vacuum pump for 4-cylinder diesel engine (1.6 l, common
rail):
The vacuum p ...
The following instructions are intended to help you find the
causes of problems effectively and objectively in the event of
complaints about the brake servo or in the ...
Other materials:
Seam seals, front body
Note
Seam seals made during repair work must be identical in
appearance and thickness to the original seam seals.
To avoid damage or faulty operation, brush seam seals smooth
near attachments which must be attached.
...
Notes on repairs to airbag and belt tensioner wiring
In addition to the general notes on repairs to wiring
harnesses, the following instructions must be observed on how to
repair wiring in airbag and belt tensioner systems:
WARNING
Airbag a ...
Connecting brake pedal to brake servo
Hold ball head of plunger rod in front of mounting and push
brake pedal in direction of brake servo, so that the ball head
clicks into place.
–
Check engagement by pulling briefly on brake pedal.
...
© 2016-2026 Copyright www.vwgolf.org

 Vacuum system
 Instructions for checking