Volkswagen Golf Service & Repair Manual: Removing and installing plenum chamber cover

Note
| The removal and installation procedures for the plenum chamber
covers may have to be modified slightly depending on model variants. |
| – |
Remove wiper arms
→ Electrical system; Rep. gr.92. |
| – |
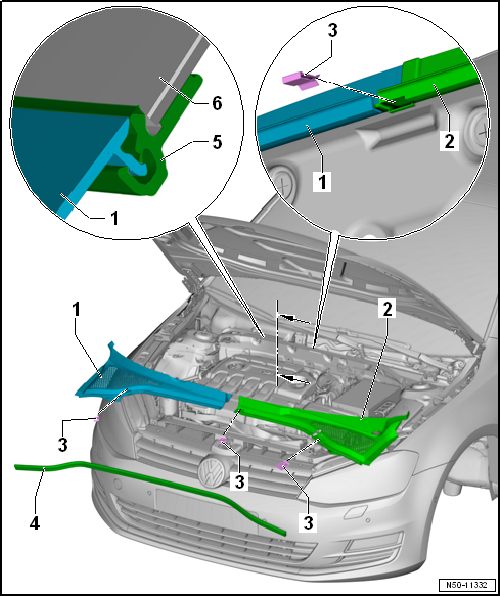
Pull off entire length of seal -4- from
plenum chamber covers -1- and
-2-. |
 Caution
| The windscreen -6- could be
destroyed. The plenum chamber cover must not be levered off with
a tool (screwdriver, wedge). The windscreen will be damaged and
may subsequently crack. |
|
| – |
Loosen clips -3- (qty. 3) at bottom. |
| – |
First pull plenum chamber cover -2-,
starting from middle, upwards from windscreen seal
-5-. |
| – |
Pull plenum chamber cover -2-
frontwards out of wing and remove it. |
| – |
Then pull plenum chamber cover -1-,
starting from middle, upwards from windscreen seal
-5-. |
| – |
Pull plenum chamber cover -1-
frontwards out of wing and remove it. |
Caution
| The windscreen -6- could be
destroyed. |
| Striking or banging the plenum chamber cover into the
windscreen seal may crack the windscreen. |
|
Note
- An insert is fitted in windscreen seal of new windscreens. Remove
this insert before installing plenum chamber cover.
- Push the plenum chamber cover into the windscreen seal by hand using
only slight force. Never force it in by hitting or using tools.
| – |
Spray windscreen seal -5- with a soapy
solution so that plenum chamber covers -1-
and -2- are easier to press in. |
| – |
First insert plenum chamber cover -1-
into wing. |
| – |
Place plenum chamber cover -1- on
beading -5-. Starting from the outside,
press into beading -5- by applying light
pressure. |
| – |
Then insert plenum chamber cover -2-
into wing. |
| – |
Place plenum chamber cover -2- on
beading -5-. Starting from the outside,
press into beading -5- by applying light
pressure. |
| – |
Attach clips -3- (qty. 3) at bottom. |
| – |
Fit seal -4- to plenum chamber covers
-1- and -2-. |
| – |
Install wiper arms
→ Electrical system; Rep. gr.92. |
Special tools and workshop equipment
required
Torque wrench -V.A.G 1783-
...
Other materials:
Function
Fig. 177 Windscreen: lane departure warning
system camera window
First read and observe the introductory information
and safety warnings Using a camera in the windscreen, the lane departure
warning system (Lane Assist) detects lines on the road that may mark the lane boundary.
If your ve ...
Adapters for setting up purging circuits
The following table contains the various adapters that are
necessary to connect the air conditioner service station to the
refrigerant circuit for purposes of purging and to bridge the
removed reservoir or collector and expansion valve
(vehicle-specific) ...
Assembly overview - emission control
1 -
Bolt
20 Nm
2 -
Bracket
Renew if damaged
3 -
Nut
Specified torque and tightening sequence
→ Fig.
4 -
Bolt
...
© 2016-2026 Copyright www.vwgolf.org

 Removing and installing plenum chamber bulkhead