Volkswagen Golf Service & Repair Manual: Removing and installing lock cylinder
| Special tools and workshop equipment
required |
|
|
|
| – |
Remove lower steering column trim
→ General body repairs, interior; Rep. gr.68. |
 Note Note
| For the removal of the lock cylinder it might be necessary
to fold aside the ignition key. |
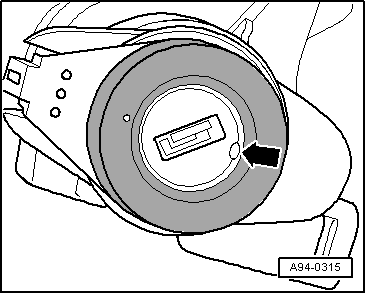
| For reasons of clarity, the ignition lock is illustrated in
the correct position without the ignition key. |
|
|

|
| – |
Turn ignition key to “Ignition ON” position. This will align
the recess in trim -arrow- with
hole in ignition lock. |
|
|
|
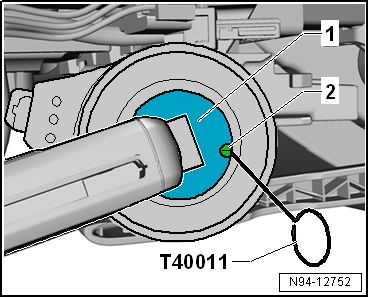
| – |
Press lock cylinder -1-
together with immobiliser reader coil into steering lock housing
-3-. |
| – |
Remove locking pin -T40011- from hole
-2-. |
| – |
Press in lock cylinder tightly until locking mechanism can
be heard to engage. |
|
|
|
1 -
Starter button -E378-
Overview of fitting locations
→ Chapter
2 -
Steering column electronics control unit -J5 ...
Removing
–
Remove lower steering column trim
→ General body repairs, interior; Rep. gr.68.
& ...
Other materials:
Assembly overview - coolant pipes
1 -
Coolant hose
2 -
Coolant pipe
Clipped onto intake manifold (bottom)
To remove, remove intake manifold
→ Chapter.
3 -
Bolt
8 Nm
4&nb ...
Dimensions – lettering on wing, “R”
1 -
Emblem
2 -
Height dimension
5.0 ± 1 mm, from upper edge of lettering to edge of wing
3 -
Horizontal dimension
1.5 ± 1 mm, from outer edge of wing to lettering
...
Radiator fan control unit -J293
Note
Available in various designs, sometimes fitted to the
radiator fan -arrows-.
This control unit switches the magnetic clutch and thus the
air conditioner compressor on and off. It cont ...
© 2016-2026 Copyright www.vwgolf.org

 WARNING
 Assembly overview - steering column switch module, with electronic ignition
lock
Assembly overview - steering column switch module, with electronic ignition
lock Removing and installing ignition key withdrawal lock solenoid -N376-