Volkswagen Golf Service & Repair Manual: Removing and installing lock carrier – petrol/diesel
Note
- The lock carrier is a safety-relevant component. For this reason, the lock carrier must only be repaired at the points indicated.
- In the event of damage, renew lock carrier
- For vehicles with adaptive cruise control unit -J428-, the adaptive cruise control unit -J428- must be adjusted anew, whenever the lock carrier has been removed, installed or replaced.
- General information and work instructions for the adaptive cruise control unit -J428- can be found in → Electrical system; Rep. gr.27
Removing
- Always use guide pins -T10093- to move lock carrier to service position → Chapter.
- Remove guide pins -T10093- from left and right longitudinal members with the aid of a second mechanic. Put down lock carrier -1- with attachments. Place it for example onto scissor-type assembly platform -VAS 6131 A-.
- Remove bumper carrier and support arm → Chapter.
- Remove bumper carrier and support arm → Chapter
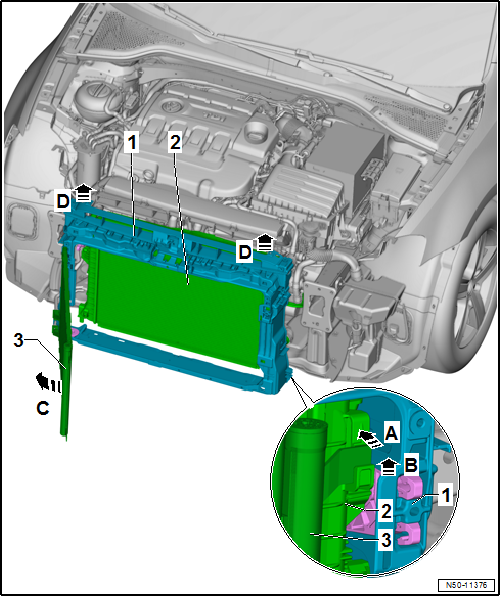
- Detach radiator module from lock carrier -arrow a-, but do not remove it → Cooling system; Rep. gr.19
- Lift condenser -3- off radiator module -2--arrow b-, swing it slightly out of lock carrier -arrow c-, but do not remove it.
- Pull out lock carrier -1- upwards between radiator module and condenser -arrows d-
 Note
Note
- Do not hang condenser and hydraulic oil cooler from lines
- Do not kink lines for condenser and hydraulic systems
Installing
Install in the reverse order of removal observing the following:
Note
- Always fit lock carrier on the bolting points at the foremost position in the elongated hole. Only then can the lock carrier move in a crash situation.
- On vehicles equipped with adaptive cruise control unit -J428-, the adaptive cruise control unit -J428- must be readjusted whenever the lock carrier has been removed, installed or renewed.
- General information and work instructions for the adaptive cruise control unit -J428- can be found in → Electrical system; Rep. gr.27
Specified torques
Lock carrier → Chapter „Assembly overview - lock carrier“
 Assembly overview - lock carrier, NAR
1 -
Lock carrier with add-on parts
Removing and installing
→ Chapter
Moving to and back from service position
→ Chapter
2&nb ...
 Moving to and back from service position
Special tools and workshop equipment
required
Guide pins ...
Other materials:
Repairing smooth pipe
Smooth pipe with a diameter or 5x1 mm or 6x1 mm can be
repaired with EPDM hose.
–
Cut damaged section at right angles out of smooth pipe which
is to be repaired.
–
Select the appropr ...
Preparing new windows for installing
Note
The area on which the adhesive bead is applied is not
precoated or primed.
The sealing lip is included with a new windscreen.
No win ...
Swellings in the tyre sidewall
A swelling in the sidewall of the tyre indicates that the
substructure of the carcass has been damaged.
Typical causes for such damage include, for example, driving
over kerbs at a sharp angle.
...
