Volkswagen Golf Service & Repair Manual: Removing and installing front bass loudspeakers -R21-/-R23
| The front left bass loudspeaker -R21- and the front right
bass loudspeaker -R23- are located in the front doors (bottom). |
 Note Note
| Removal and installation are described for the left side.
Removal and installation on the right side are carried out in
the same way. |
| – |
Switch off ignition and all electrical consumers, and remove
ignition key. |
| – |
Remove door trim panel
→ General body repairs, interior; Rep. gr.70 |
|
|
|
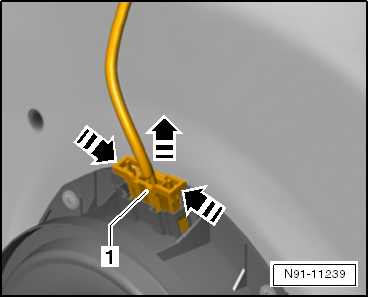
| – |
Release locking mechanism of connector on front left bass
loudspeaker -R21- in direction of arrow. |
| – |
Pull connector -1- out. |
|
|
|
Rear left treble loudspeakers -R14-/rear right treble
loudspeakers -R16- are located in rear door trim panels.
Note
If the trebl ...
Rear left bass loudspeakers -R15-/rear right bass
loudspeakers -R17- are located in side panel.
Note
Removal and installation are desc ...
Other materials:
Wheel cover
Fig. 220 Removing the wheel covers
First read and observe the introductory information
and safety warningsRemoving the wheel covers
Take the box spanner and wire hook from the vehicle toolkit.
Insert the wire hook into one of the holes in the wheel cover.
Push the box spanner thr ...
Washing the vehicle
First read and observe the introductory information
and safety warnings The longer substances such as insects, bird droppings,
resinous tree sap, road dirt, industrial deposits, tar, soot or road salt and other
corrosive materials remain on the vehicle, the more damage they do to the paintwo ...
Overview of fitting locations – control units, rear
1 -
Remote control receiver for auxiliary coolant heater -R149-
Removing and installing remote control receiver for auxiliary
coolant heater -R149-
→ Heating, Air conditioning; Rep. gr.82
2 -
Two-way signa ...
© 2016-2026 Copyright www.vwgolf.org

 Caution
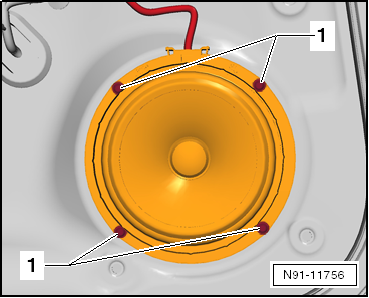
 Removing and installing rear treble loudspeakers -R14-/-R16-, 4-door
 Removing and installing rear bass loudspeakers -R15-/-R17-, 2-door