Volkswagen Golf Service & Repair Manual: Removing and installing exterior mirror adjuster -EX11-
 Note Note
| The removal and installation procedures are described for
LHD vehicles. Removal and installation for RHD vehicles are
similar. |
 Caution
| Danger of damage to component surfaces. |
| When using leverage tools, mask visible areas of the
component with commercially available adhesive tape. |
|
|
|
|
| – |
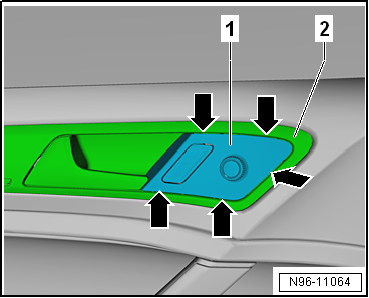
Carefully release catches -arrows-
using a small screwdriver. |
| – |
Pull exterior mirror adjuster -EX11--1-
out of exterior mirror adjuster trim -2-. |
| – |
Disconnect electrical connectors. |
| – |
If fitted, remove driver side interior locking button for
central locking system -E308-
→ Chapter. |
| Install in the reverse order of removal, observing the
following: |
| – |
If present, install driver side interior locking button for
central locking system -E308-
→ Chapter. |
|
|
|
Note
The removal and installation procedures are described for
LHD vehicles. Removal and installation for RHD vehicles are
similar.
...
Note
The removal and installation procedures are described for
LHD vehicles. Removal and installation for RHD vehicles are
similar.
...
© 2016-2026 Copyright www.vwgolf.org


 Removing and installing glove compartment light switch -E26-
 Removing and installing operating unit for window regulator in driver door
-E512-
Removing and installing operating unit for window regulator in driver door
-E512-