Volkswagen Golf Service & Repair Manual: Removing and installing evaporator
 Note Note
| The illustration shows a left-hand drive vehicle. The
removal and installation procedure is identical for both
versions. |
| – |
Observe instructions when working on refrigerant circuit
→ Chapter. |
| – |
Remove heater and air conditioner unit
→ Chapter. |
|
|
|
| – |
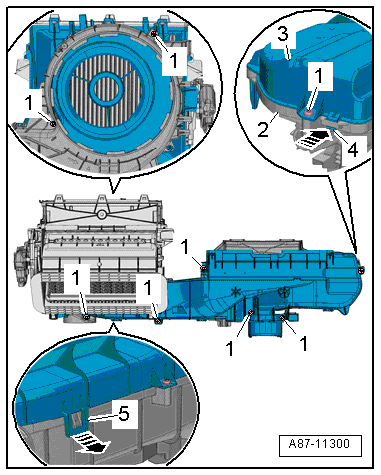
Release retaining tabs -4- and
-5--arrows-. |
| – |
Detach the top part of the evaporator housing
-3- from the bottom part
-2-. |
|
|
|
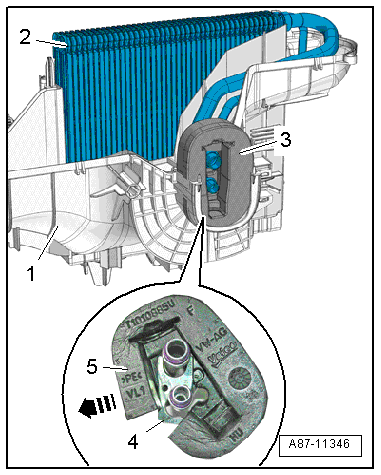
| – |
Pull the evaporator -2- out of
the bottom part of the evaporator housing
-1-. |
| – |
Remove expansion valve
→ Chapter. |
| – |
Detach the seal/insulation -3-.
To do so, pull aside the movable part
-5--arrow-. |
| – |
Remove retaining plate -4- for
refrigerant lines. |
| Installation is carried out in the reverse order. When
installing, note the following: |
| – |
If the new evaporator is not equipped with an expansion
valve, the expansion valve from the old evaporator must be
installed
→ Chapter. |
Note
| Even minute leakage at the tongue-and-groove joint between
the top and bottom part of the evaporator housing can lead to
whistling noise as a result of escaping air. Therefore lightly
coat joints with silicone grease to fully seal the joints.
Silicone grease
→ Electronic Parts Catalogue. |
| Before inserting evaporator, check condensation drain and
clean if necessary. |
| Before inserting, clean evaporator housing and, if
necessary, evaporator. |
| → Chapter „Assembly overview - evaporator housing“ |
|
|
 |
Note
Leave the holders in the vehicle on removing the heater and
air conditioning unit. The illustration shows a left-hand drive
vehicle.
...
Removing
–
Remove baffle plate
→ Chapter.
–
Dis ...
Other materials:
2-pack spray filler
Designation:
2-pack spray filler -ALN 788 007-
Issued 06/2011
Product description
The 2-pack spray filler -ALN 788 007- is a two-pack spray
filler use in vehicle repai ...
Removing and installing track rod
Special tools and workshop equipment
required
Torque wrench -V.A.G 1331-
Torque wrench -V.A.G 1332-
...
Declaration of conformity
First read and observe the introductory information
and safety warnings The individual manufacturer declares herewith that the
following products conform, at the time of vehicle production, with the basic requirements
and other relevant laws and regulations, including FCC Part 15.19, FCC Par ...
© 2016-2026 Copyright www.vwgolf.org

 Removing and installing holder for heater and air conditioning unit
 Removing and installing fresh air blower control unit -J126-, LHD vehicles