Volkswagen Golf Service & Repair Manual: Removing and installing damper weight for refrigerant line, low-pressure
side
| Special tools and workshop equipment
required |
|
|
|
| Torque wrench -V.A.G 1331/- (5…50 Nm) |
| – |
Observe safety precautions when working in the vicinity of
high-voltage components
→ Chapter „Safety precautions when working in the vicinity of
high-voltage components“. |
 Note Note
| It is not necessary to remove the refrigerant line in order
to remove and install the damper weight. |
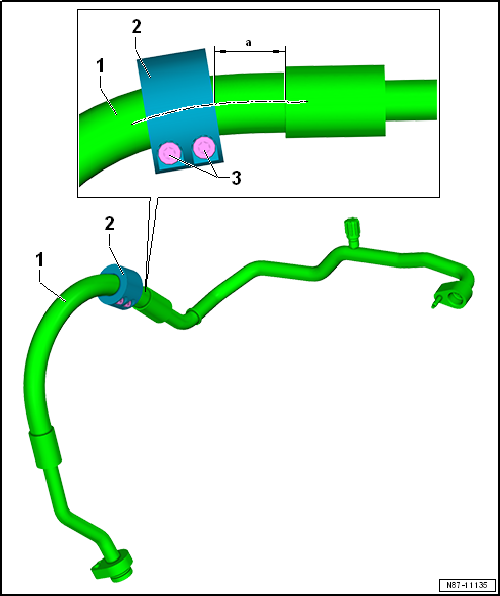
| Depending on the vehicle model, type of refrigerant lines
and production period, an additional damper weight
-2- may be installed on refrigerant
line -1-
→ Electronic Parts Catalogue. |
|
|
|
| – |
Remove damper weight -2- from
refrigerant line on low-pressure-side -1-. |
| – |
Fit damper weight -2- on
refrigerant line on low-pressure-side -1-.
Take specified dimension -a- = 30 ±
5 mm into account while doing so. |
Note
| Ensure that the damper weight -2-
is firmly seated on the refrigerant line and that it won't make
contact with any other components during any condition. |
| The refrigerant line on the low-pressure side
-1- must not be pinched due to the
additional weight -B-. |
|
|
|
|
Component |
Specified torque |
| Bolts on damper
weight |
10 ± 1 Nm |
Special tools and workshop equipment
required
Torque wrench -V.A.G 1331/- (5…50 Nm)
...
Special tools and workshop equipment
required
Torque wrench -V.A.G 1783
& ...
© 2016-2026 Copyright www.vwgolf.org

 Removing and installing condenser
 Removing and installing evacuating and charging valves on low and
high-pressure side
Removing and installing evacuating and charging valves on low and
high-pressure side