Volkswagen Golf Service & Repair Manual: Removing and installing centre console trim in footwell
 Note Note
| Removal and installation is described for the centre console
trim in footwell on driver side. Follow same instructions for
the front passenger side as appropriate. |
| Special tools and workshop equipment
required |
|
|
|
|
|
|
Torque wrench -V.A.G 1783- |
| – |
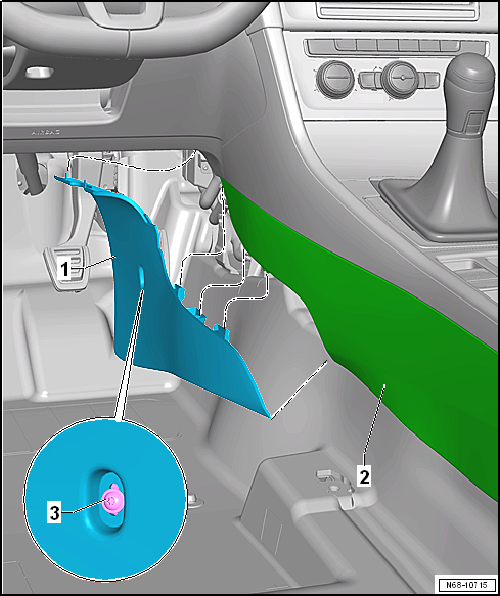
Pull centre console trim in footwell -1-
downwards out of mountings in centre console -2-
and remove it. |
Note
| Before installing, check all fasteners for damage and renew
if necessary. |
| Installation is carried out in reverse order. |
| |
→ Chapter „Assembly overview - centre console“ |
|
|
|
Special tools and workshop equipment
required
Removing
–
Move front seat ...
Removing
–
Starting at bottom, unclip trim for operating and display
unit -1- from operating and display
unit -2- and remove it.
...
Other materials:
Tyre damage
First read and observe the introductory information
and safety warnings Damage to tyres and rims is often not readily visible.
Any unusual vibrations or signs that the car is pulling
to one side may indicate that one of the tyres is damaged .
Reduce your speed immediately if you susp ...
Infrared heater -VAS 6878-
Designation:
Infrared heater -VAS 6878-
Product description:
The infrared heater is used to dry putty, filler, base coat,
top coat and clear coat on vertical or horizontal surfaces.
...
Overview of fitting locations- sound system, vehicles with Dynaudio sound
system
On vehicles equipped with a Dynaudio sound system,
high-quality Dynaudio loudspeakers can be found at standard
fitting locations. The Dynaudio sound system can be identified
by the lettering Dynaudio on front treble loudspeaker trims. A
subwoofer install ...
© 2016-2026 Copyright www.vwgolf.org

 Removing and installing rear centre console trim
 Removing and installing trim for operating and display unit