Volkswagen Golf Service & Repair Manual: Removing and installing centre console retainer, for all vehicles except
e-Golf
| Special tools and workshop equipment
required |
|
|
|
 Note Note
| Removal and installation is described for the front bracket
on the driver side. Follow same instructions for the front
passenger side as appropriate. |
| – |
Remove centre console trim in footwell on driver side
→ Chapter. |
|
|
|
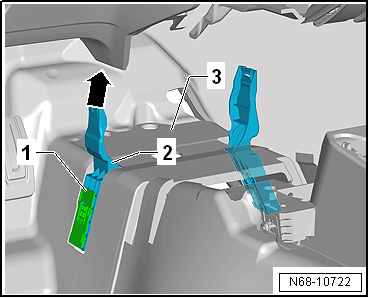
| – |
Push floor covering in area of front bracket
-2- aside. |
| – |
Release cover -1- from front
bracket -2- and remove it. |
| – |
Remove front bracket -2-
upwards from tunnel -3-. |
|
|
|
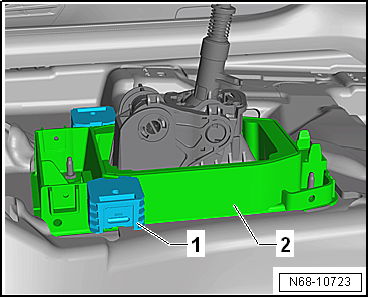
| – |
Remove centre console
→ Chapter. |
| – |
Remove bolt -1- on left and
right. |
| – |
Remove securing bracket -2-
upwards from selector mechanism insulation
-3-. |
|
|

|
| Bracket in front of selector mechanism |
Note
| Removal and installation is described for the bracket in
front of selector mechanism on driver side. Follow same
instructions for the front passenger side as appropriate. |
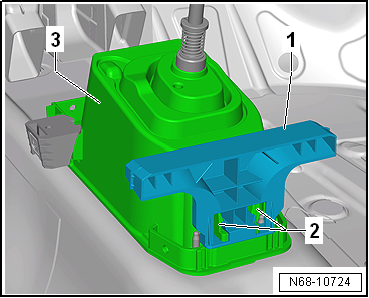
| – |
Remove centre console
→ Chapter. |
| – |
Remove retainer -1- from
selector mechanism insulation -2-. |
|
|
|
| Bracket behind selector mechanism |
| – |
Remove centre console
→ Chapter. |
| – |
Push retaining lugs -2-
outwards. |
| – |
Remove retainer -1- from
selector mechanism insulation -3-. |
Note
| Before installing, check all fasteners for damage and renew
if necessary. |
| Installation is carried out in reverse order. |
|
|
|
| Bracket in front of selector mechanism |
| Insert retainer in front of selector mechanism
-1- into the rear mountings of
selector mechanism insulation -2-. |
| |
→ Chapter „Assembly overview - centre console“ |
|
|
|
Special tools and workshop equipment
required
Removal wedge -3409
...
Special tools and workshop equipment
required
Torque wrench -V.A.G 1783-
...
Other materials:
Introduction
This chapter contains information on the following subjects:
→ Description of the central locking system
→ Locking and unlocking the vehicle from the outside
→ Locking and unlocking the vehicle from the inside
→ Locking and unlocking the vehicle with ...
Removing and installing rear shelf support
Note
Removal and installation are described for the left vehicle
side. Follow same instructions for the right side as
appropriate.
Special tools and workshop equipment
required
...
Removing and installing heater and air conditioning unit
Special tools and workshop equipment
required
Torque wrench -V.A.G 1331/- (5…50 Nm)
Hose clamps up to 25 mm -3094-
...
© 2016-2026 Copyright www.vwgolf.org

 Removing and installing mounting plate with retaining strap
 Removing and installing centre console retainer, securing bracket and
insulation for selector mechanism, e-Golf only
Removing and installing centre console retainer, securing bracket and
insulation for selector mechanism, e-Golf only