Volkswagen Golf Service & Repair Manual: Removing and installing brake servo, right-hand drive vehicle
| Special tools and workshop equipment
required |
|
|
|
| Torque wrench -V.A.G 1331- |
|
|
|
| Torque wrench -V.A.G 1410- |
| Tool inserts (11 mm) -V.A.G 1331/2- |
|
|
|
| Brake filling and bleeding equipment -VAS 5234- |
|
|

|
| Sealing plug repair kit -1H0 698 311 A- |
| Hot air blower, e.g. hot air blower -VAS 1978/14A- |
|
|
|
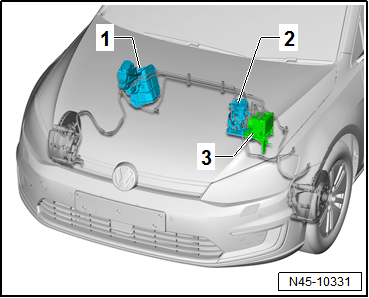
| The brake servo with brake master cylinder is located on the
right-hand side of the engine compartment. |
| 1 - |
Brake servo and brake master cylinder |
| 2 - |
Brake system pressure accumulator -VX70- |
| 3 - |
ABS control unit -J104- with ABS hydraulic unit -N55- |
| Do not bend the brake lines in the area of the hydraulic
unit! |
| – |
Observe safety precautions when working on the high-voltage
system
→ Chapter. |
| – |
Observe the risk classification of the high-voltage system
→ Electric drive; Rep. gr.00. |
|
|
|
| Danger to life due to high voltage |
| The high-voltage system is under high voltage. If high-voltage
components are damaged, there is a risk of severe or fatal injury due to
electric shock. |
| – |
Carry out visual inspection of high-voltage components and cables. |
| – |
Never use cutting or forming tools, or any others with sharp edges. |
| – |
Never use heat sources such as welding, soldering, thermal bonding
or hot air. |
| – |
Disconnect battery
→ Electrical system; Rep. gr.27. |
| – |
Remove brake master cylinder
→ Chapter. |
| – |
Remove catalytic converter
→ Rep. gr.26. |
| – |
Unclip air conditioning line in the area of the brake servo
→ Heating, air conditioning; Rep. gr.87. |
| – |
Remove footwell cover on driver side
→ General body repairs, interior; Rep. gr.68. |
| – |
Remove storage compartment on driver side
→ General body repairs, interior; Rep. gr.68. |
| – |
Remove footwell vent -1- on
driver side
→ Heating, air conditioning system; Rep. gr.87. |
|
|
|
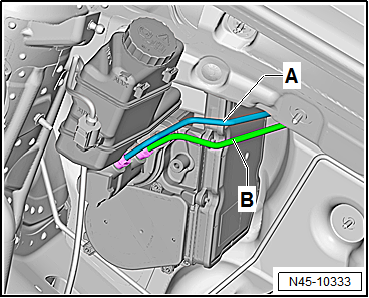
| – |
Mark brake lines -A- and
-B- on brake master cylinder
-1-. |
| – |
Unscrew brake lines -A- and
-B- from brake master cylinder. |
| – |
Immediately seal brake lines and open connections with
sealing plugs from repair kit -1H0 698 311 A- or suitable plugs
from engine bung set -VAS 6122-. |
| – |
Carefully pull brake servo off plenum chamber bulkhead. |
| – |
Lay brake servo to side. |
|
|
|
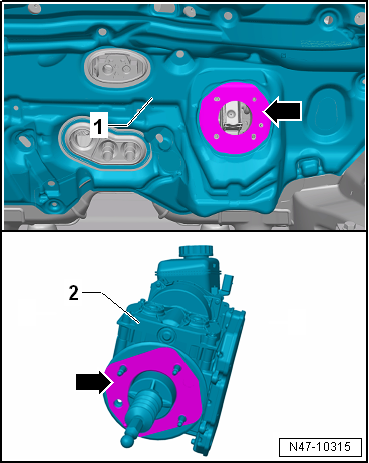
| – |
Release connector -2- and pull
it off brake servo -1-. |
| Ensure no brake fluid gets onto contacts. |
| Never allow brake fluid to come into contact with fluids
that contain mineral oils (e.g. oil, petrol, cleaning agents).
Mineral oils damage the plugs and seals in the brake system. |
| Brake fluid is poisonous and must never be sucked out by
mouth through a hose. Because of its caustic properties, it must
also not come into contact with paintwork. |
| Do not reuse drawn-off brake fluid. |
| Always observe the relevant environmental regulations for
disposal. |
|
|

|
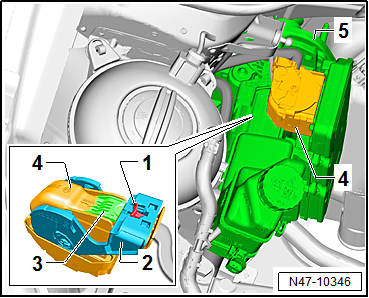
| – |
Pull locking slide (red) -1-
towards front. |
| – |
Press release tab -3- on
connector -4-. |
| – |
Release latch -2- and pull
connector -4- off brake servo
-5-. |
|
|
|
| – |
Remove adhesive residue -arrows-
from brake servo -2- and plenum
chamber bulkhead -1-. |
| – |
To do so, apply gentle heat from hot air blower to the
adhesive residue and pull it off. |
| – |
Thoroughly clean surfaces. |
| Install in reverse order. Note the following points: |
| – |
Renew seal between brake servo and plenum chamber bulkhead
→ Item. |
| – |
Carefully insert brake servo and tighten nuts hand-tight. |
| – |
Connect brake pedal to brake servo
→ Chapter. |
| – |
Bleed brake system
→ Chapter. |
| – |
Subsequently bleeding the brake system
→ Chapter. |
| – |
Code brake servo control unit -J539-
→ Vehicle diagnostic tester. |
| – |
Perform basic setting for electromechanical brake servo
→ Vehicle
diagnostic tester. |
| → Chapter „Assembly overview – Brake system pressure accumulator
-VX70-, RHD vehicles“ |
| → Electrical system; Rep. gr.27. |
| → Electrical system; Rep. gr.27 |
| → General body repairs, interior; Rep. gr.68 |
| → Heating, air conditioning system; Rep. gr.87. |
|
|
|
Special tools and workshop equipment
required
Torque wrench -V.A.G 1331-
...
Repairing brake lines
The flanging tool for brake lines -VAS 6056- can be used to
flange brake lines with an outer pipe diameter of 5 mm without ...
© 2016-2026 Copyright www.vwgolf.org

 Note
Note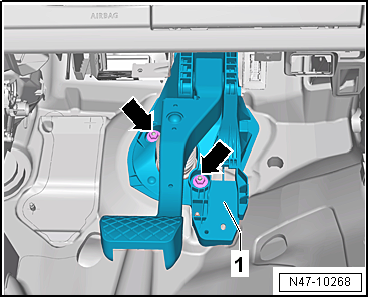
 Removing and installing brake servo, LHD vehicles
 Brake lines