Volkswagen Golf Service & Repair Manual: Removing and installing air distribution flap control motor -V428-, RHD
vehicles
| Special tools and workshop equipment
required |
| Vehicle diagnostic tester |
| First carry out the following work: |
| – |
Switch off all electrical consumers. |
| – |
Remove glove compartment
→ General body repairs, interior; Rep. gr.68. |
|
|
|
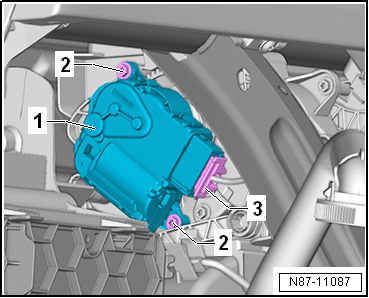
| – |
Pull off front air distribution flap control motor -V426--1-
and remove it. |
| – |
Disconnect electrical connector -3-. |
| Installation is carried out in the reverse order. When
installing, note the following: |
 Note Note
| Check operation of flaps and hinge mechanism before fitting. |
| Make sure levers and shafts are properly fitted in the
mounts. |
|
|
|
Special tools and workshop equipment
required
Vehicle diagnostic tester
Removing
–
...
Removing
–
Remove dash panel
→ General body repairs, interior; Rep. gr.70.
–
Remov ...
Other materials:
Pedals
Fig. 132 Pedals in vehicles with a manual
gearbox: ① accelerator, ② brake pedal, ③ clutch pedal
Fig. 133 Pedals in vehicles with an automatic
gearbox: ① accelerator, ② brake pedal
First read and observe the introductory information
and safety warnings The operation and freedom ...
Removing and installing right vent temperature sender -G151
Special tools and workshop equipment
required
Vehicle diagnostic tester
Removing
Note
Only on vehicles with Climatronic. On vehicles with heater
or air conditioning syste ...
Adjusting the steering wheel position
Fig. 50 Adjusting the steering wheel position
mechanically
First read and observe the introductory information
and safety warnings Adjust the steering wheel position before setting off
and only when the vehicle is stationary.
Push down the lever .
Adjust the steering wheel s ...
© 2016-2026 Copyright www.vwgolf.org

 Removing and installing air distribution flap control motor -V428-, LHD
vehicles
Removing and installing air distribution flap control motor -V428-, LHD
vehicles Removing and installing front air distribution flap actuation unit, heater
and air conditioning system with electric/manual controls, LHD vehicles
Removing and installing front air distribution flap actuation unit, heater
and air conditioning system with electric/manual controls, LHD vehicles