Volkswagen Golf Service & Repair Manual: Overview of fitting locations - operating and display unit, Climatronic
 Note Note
| A warning lamp in the instrument panel controls will
indicate that the selected function is active. In addition, the
display of the radio or of the radio navigation system will
indicate the selected function for a short time when a button is
pressed or a regulator is operated. |
| You can switch between °C and °F in the radio or radio
navigation system display via the main menu in the dash panel
insert. Press rocker switch in windscreen wiper lever (or in
multifunction steering wheel) to call up main menu. Then select
Settings, Units and Temperature. |
| If new heater and air conditioning controls -EX21- with
Climatronic control unit -J255- is installed, the basic setting
and an adaptation (“Compressor first run”) must be carried out
in the "Guided fault finding" or in the "Guided functions". |
| In vehicles with start-stop system, note abort conditions:
→ Chapter |
| If the warning lamp does not light up after the
AC button is pressed, a fault may be
stored in the control unit. Call up event memory using vehicle
diagnostic tester. If the event entry “Compressor first run not
performed” is stored, an adaption (“Compressor first run”) must
be carried out in the "Guided fault finding". |
| Pressing the AUTO button will
cancel all settings which deviate from automatic operation. |
| Deviations from automatic operation ⇒ appropriate operating
instructions. |
| OFF button activated, Climatronic
out of operation. There is no heating and ventilation. |
| OFF button deactivated,
Climatronic in operation. |
| A/C button activated, air
conditioner compressor switched on. The heating and ventilation
operations continue to be controlled electronically. |
| A/C button deactivated, air
conditioner compressor will be switched to almost zero delivery.
The heating and ventilation operations continue to be controlled
electronically. |
| In vehicles with start-stop system, note abort conditions:
→ Chapter |
|
|
|
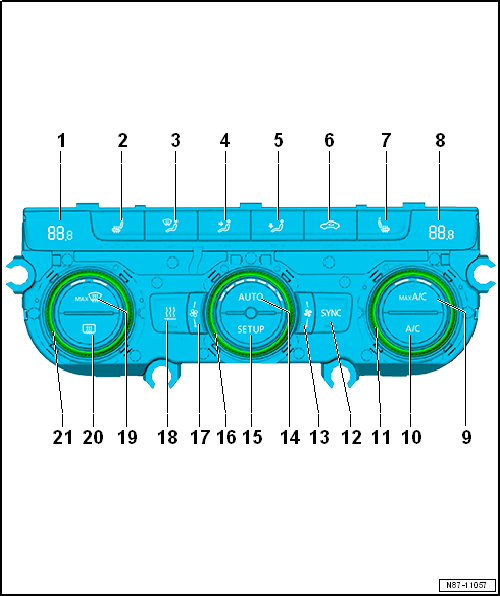
| 1 - |
Left temperature indicator |
| Indicates temperature setting on driver side. |
| 2 - |
Left seat heating button -E653- |
| Seat heater has 3 heat settings. Current setting is shown by LED. |
| If no LED is lit, seat heating is switched off. |
| 3 - |
Windscreen air distribution button |
| LED lights up when settings are active. |
| 4 - |
Centre air distribution button |
| Air distributed to upper body via middle vents. |
| LED lights up when settings are active. |
| 5 - |
Lower air distribution button |
| Air distributed to footwell. |
| LED lights up when settings are active. |
| 6 - |
Air recirculation button |
| LED lights up when settings are active. |
| Manual and automatic air recirculation mode. |
| Pressing the air recirculation button will prevent polluted air from
entering the interior. |
| Air recirculation is switched on automatically under the following
conditions: |
| l |
when the windscreen washer system is operated; |
| l |
when the air quality sensor -G238- is active; |
| l |
when reverse gear is engaged (this function is active only for the
first 2 minutes after starting engine); |
| l |
Blower speed on heater and air conditioning controls -EX21- off, |
| l |
heater and air conditioning controls -EX21-“OFF”. |
| 7 - |
Right seat heating button -E654- |
| Seat heater has 3 heat settings. Current setting is shown by LED. |
| If no LED is lit, seat heating is switched off. |
| 8 - |
Right temperature indicator |
| Indicates temperature setting on front passenger side. |
| LED lights up when settings are active. |
| Air conditioning system is operated with maximum cooling output. |
| LED lights up when settings are active. |
| If the AC button is deactivated, the air
conditioner compressor will be set to almost zero delivery. If the
AUTO button is activated, heating and
ventilation mode will continue to be controlled electronically. |
| 11 - |
Rotary knob for setting right temperature |
| Set temperature is indicated in display. |
| LED lights up when settings are active. |
| Synchronisation of climatic zones with driver value. |
| Display only, no function. |
| 14 - |
AUTO function button |
| LED lights up when settings are active. |
| In automatic mode, the Climatronic maintains the selected interior
temperature automatically. With this setting, the vent air temperature,
the blower speed and the air distribution are controlled automatically. |
| When SETUP button is pressed, the menu
for setting e.g. recirculation mode, auxiliary heater mode etc. is
displayed. |
| 16 - |
Rotary knob for blower adjustment |
| Turning the rotary wheel enables individual adjustment of the fan
speed |
| If the fan speed is changed individually, the
AUTO function is deactivated automatically. |
| 17 - |
Increase blower speed |
| Display only, no function. |
| 18 - |
Instant heat button for switching auxiliary heater On/Off or
OFF button for switching air conditioning
system On/Off |
| OFF button activated, Climatronic out of
operation. There is no heating and ventilation. |
| 19 - |
Max. defrost function button |
| Air drawn in from the outside is channelled to the windscreen and
air recirculation mode, if activated, is automatically switched off. |
| To demist the windscreen as quickly as possible, the air is dried at
temperatures above approx. + 1.5 °C (+ 35 °F). The air conditioner
compressor is switched on and the blower is set to a high speed. |
| 20 - |
Heated rear window button |
| LED lights up when settings are active. |
| Only works while engine is running and switches off automatically
after 10 minutes at the latest. |
| 21 - |
Rotary knob for setting left temperature |
| Set temperature is indicated in display. |
Note
A warning lamp in the instrument panel controls will
indicate that the selected function is active.
If the warning la ...
Special tools and workshop equipment
required
Removal wedge -3409-
Note
...
Other materials:
Pressure and boiling point
The boiling points given in the table below are always based
on an atmospheric pressure of 1 bar. If the pressure on a liquid
is changed, its boiling point changes also.
It is well known that, for example, the lower the pressure,
the low ...
Operating Adaptive Cruise Control (ACC)
Fig. 169 Left-hand side of the multifunction
steering wheel: buttons for operating the Adaptive Cruise Control (ACC)
First read and observe the introductory information
and safety warnings When the Adaptive Cruise Control (ACC) is switched on,
the green indicator lamp in the instrument cl ...
Vibration, conducting a road test before balancing wheels
If a customer brings a vehicle to the workshop complaining
about “vibration”, a road test is essential prior to balancing
the wheels.
This will give you information about the nature of the
vibration.
...
© 2016-2026 Copyright www.vwgolf.org

 Overview of fitting locations - operating and display unit, air conditioning
system with electric/manual controls
Overview of fitting locations - operating and display unit, air conditioning
system with electric/manual controls Removing and installing operating and display unit, air conditioning system
with electric/manual controls and Climatronic
Removing and installing operating and display unit, air conditioning system
with electric/manual controls and Climatronic