Volkswagen Golf Service & Repair Manual: Flat connector systems
 Note Note
| If necessary, any housing catches in place (secondary
locking mechanisms) must be released or removed prior to
disengaging the contacts using the prescribed tool
→ Chapter. |
|
|
|
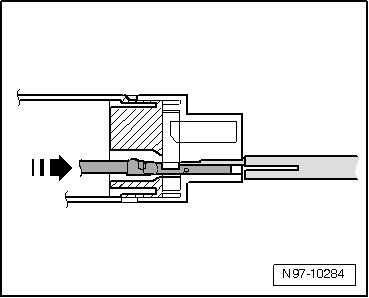
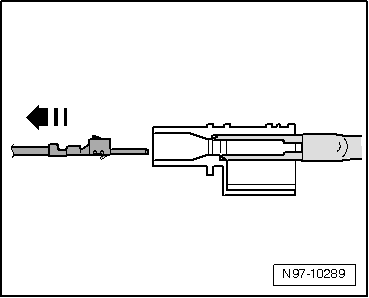
| Flat connector with one locking tab: |
| – |
Insert the release tool appropriate for the contact housing
in the release port of the contact housing. |
| – |
Grab hold of the contact by the wire and push it lightly
into the contact housing -arrow-. |
Note
| By pushing the contact in the direction of the contact
housing, the locking tab of the contact is lifted up by the
housing edge and can be disengaged using the release tool. |
|
|
|
| – |
At the same time, push the release tool in the direction of
the contact housing and pull out the released contact from the
contact housing -arrow-. |
| – |
The release tool can be pulled out of the contact housing
again once the contact has been removed. |
|
|

|
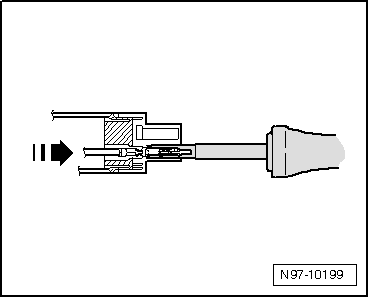
| Flat connector with two locking tabs: |
| – |
Insert the release tool appropriate for the contact housing
in the release port of the contact housing. |
| – |
Grab hold of the contact by the wire and push it fully into
the contact housing -arrow-. |
Note
| By pushing the contact in the direction of the contact
housing, the locking tabs of the contact are lifted up by the
housing edge and disengaged using the release tool. |
|
|
|
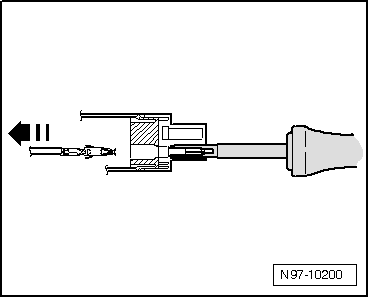
| – |
At the same time, push the release tool in the direction of
the contact housing and pull out the released contact from the
contact housing -arrow-. |
| – |
The release tool can be pulled out of the contact housing
again once the contact has been removed. |
|
|
|
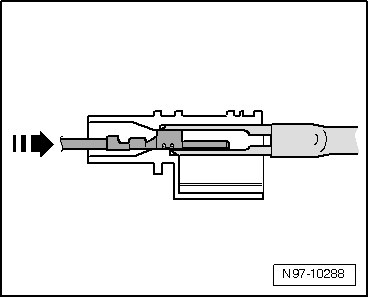
| – |
Insert the release tool appropriate for the contact housing
in the release port of the contact housing. |
| – |
Grab hold of the contact by the wire and push it lightly
into the contact housing -arrow-. |
Note
| By pushing the contact in the direction of the contact
housing, the locking tabs of the contact are lifted up by the
housing edge and disengaged using the release tool. |
|
|
|
| – |
At the same time, push the release tool in the direction of
the contact housing and pull out the released contact from the
contact housing -arrow-. |
| – |
The release tool can be pulled out of the contact housing
again once the contact has been removed. |
|
|
|
Note
If necessary, any housing catches in place (secondary
locking mechanisms) must be released or removed prior to
disengaging the contacts using the ...
Note
If necessary, any housing catches in place (secondary
locking mechanisms) must be released or removed prior to
disengaging the contacts using the ...
Other materials:
2-pack surfacer
Designation:
2-pack surfacer -LLS MAX 202 M2-, medium grey
Issued 03.2013
Product description
The 2-pack surfacer -LLS MAX 202 M2-, medium grey, is a
high-grade two-pack HS s ...
Flat spots caused by hard braking
This type of flat spots may be caused by hard braking on a
rough surface such as a tarmac road.
During this type of braking manoeuvre only a certain area of
the tyre is abraded accordingly and therefore causes an
imbala ...
Removing and installing control unit for electronic steering column lock
-J764-
Note
When renewing control unit, select
Renewal function for respective control unit in “Guided
fault finding” or “Guided functions” using → Vehicle
diagnostic tester.
Special tools and workshop equipmen ...
© 2016-2026 Copyright www.vwgolf.org

 Round connector systems
 Special connector systems