Volkswagen Golf Owners Manual: Changing bulbs in the tail light cluster in the tailgate
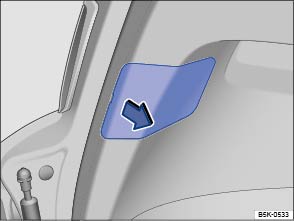
Fig. 237 In the tailgate: removing the cover
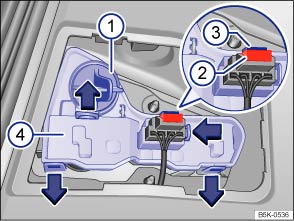
Fig. 238 In the tailgate: removing the bulb holder
 First read and observe the introductory information
and safety warnings
First read and observe the introductory information
and safety warnings| The actions should only be carried out in the specified order: | |
|---|---|
| 1. | Observe and follow the instructions on the checklist. |
| 2. | Open the tailgate. |
| 3. | Carefully prise off the cover in the direction of the arrow using the flat blade of the screwdriver from the vehicle toolkit . |
| 4. | Pull out the fuse . Press the catches ③ on the connector and pull out the connector. |
| 5. | Release the retaining lugs on the bulb holder in the direction of the arrow and pull out the bulb holder. |
| 6. | Replace the defective bulb with a new bulb of the same type. |
| 7. | Replace the bulb holder. The retaining lugs must audibly click into place. |
| 8 | Attach the connector to the bulb holder and fit the cover. The cover must engage fully and securely. |

There are various types of rear light, so the position and design of covers, bulbs and bulb holders may vary from those shown in the illustrations.
In tail lights with LED technology, the reversing light is fitted with a normal bulb. This bulb can be changed.
 Changing bulbs in the front bumper
Fig. 236 In the front right wheel housing
liner: changing a bulb in the headlight
First read and observe the introductory information
and safety warningsBefore changing the bulb in the left-hand ...
 Changing bulbs in the tail light cluster in the body
Fig. 239 On the side of the luggage compartment:
removing the tail light cluster
Fig. 240 Tail light cluster in the body:
removing the bulb holder ① to ⑤: release tabs
First read and obser ...
Other materials:
Removing and installing fuel gauge sender -G-, vehicles with front-wheel
drive
Removing
–
Remove fuel delivery unit
→ Chapter.
–
Note colour assignment of cables -1-
for re-installation.
– ...
Layout - infotainment system, Composition Media and Discover Media version
Control unit 1 for information electronics -J794-
Display unit for control device of front display and
information control panel -J685-
CD drive
SD memory card reader: Discover Media wi ...
Adjusting Bowden cable for backrest release mechanism
WARNING
Ensure backrest is locked in position (default
position), otherwise it can tilt forwards in an
uncontrolled manner.
–
Remove backrest cover and backre ...
