Volkswagen Golf Owners Manual: Changing bulbs in the tail light cluster in the body
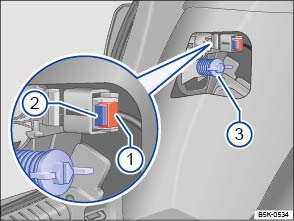
Fig. 239 On the side of the luggage compartment: removing the tail light cluster
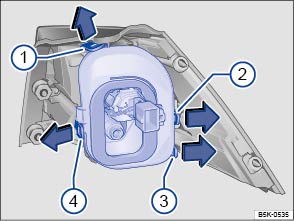
Fig. 240 Tail light cluster in the body: removing the bulb holder ① to ⑤: release tabs
 First read and observe the introductory information
and safety warnings
First read and observe the introductory information
and safety warningsThe steps should only be carried out in the specified order.
Removing the tail light cluster
| 1. | Observe and follow the instructions on the checklist. |
| 2. | Open the tailgate. |
| 3. | Take hold of the opening in the side trim in the luggage compartment (slit ) and pull the trim forwards. |
| 4. | Pull out the fuse . Press the catches ② on the connector and pull out the connector. |
| 5. | Unscrew the securing bolts by hand . |
| 6. | Carefully pull the tail light cluster to the rear to remove it from the body. Place it on a clean, smooth surface. |
Changing the bulb
| 7. | To release the bulb holder, push the tabs to ④ in the direction of the arrows. |
| 8. | Remove the bulb holder from the tail light cluster. |
| 9. | Replace the defective bulb with a new bulb of the same type. |
| 10. | Insert the bulb holder into the tail light cluster. The release tabs must click into place. |
Fitting the tail light cluster
| 11. | Carefully put the tail light cluster into the opening in the body. |
| 12. | Use one hand to hold the tail light cluster in the fitting position while using the other hand to screw the securing bolt firmly back on . |
| 13. | Check that the tail light cluster is positioned correctly and securely. |
| 14. | Attach the connector to the bulb and press in the fuse ①. |
| 15. | Fit the side trim back into the luggage compartment. |
| 16. | Close the tailgate. |

There are various types of rear light, so the position and design of covers, bulbs and bulb holders may vary from those shown in the illustrations.
In tail lights with LEDs, some light elements may be fitted with normal bulbs. These bulbs can be changed.
 Changing bulbs in the tail light cluster in the tailgate
Fig. 237 In the tailgate: removing the
cover
Fig. 238 In the tailgate: removing the
bulb holder
First read and observe the introductory information
and safety warnings
...
 Changing the bulb in the number plate light
Fig. 241 In the rear bumper: number plate
light
Fig. 242 Number plate light: removing the
bulb holder
First read and observe the introductory information
and safety warnings
...
Other materials:
Assembly overview - rear side airbag
1 -
Seat bolster
2 -
Electrical wiring
From rear side airbag igniter on driver side -N201-/rear side airbag
igniter on front passenger side -N202-
WARNING
Observe safety instructions for pyrote ...
Removing and installing rear 3-point seat belt, estate, with belt tensioner
Removing
WARNING
Observe safety instructions for pyrotechnic
components
→ Chapter.
Observe disposal regulations for p ...
Removing and installing treble horn -H2- / bass horn -H7-
Note
Removal and installation are described for the left side.
Removal and installation on the right side are carried out in
the same way.
Removing horn
–
...
