Volkswagen Golf Service & Repair Manual: Assembly overview - transverse link, multi-link suspension, front-wheel drive
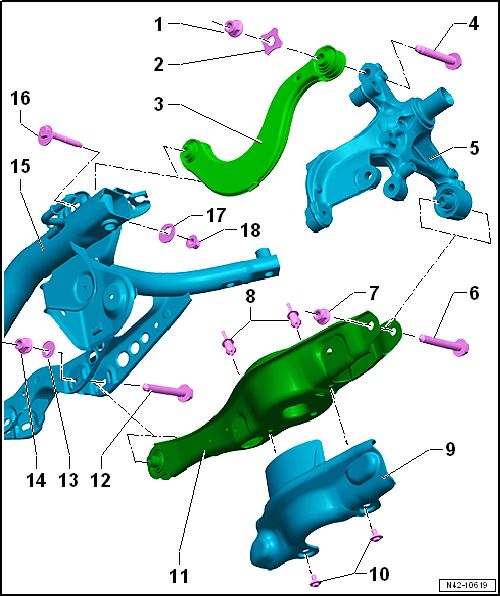
| 1 - | Nut |
| Renew after removing |
| 2 - | Washer |
| 3 - | Upper transverse link |
| Removing and installing → Chapter |
| 4 - | Bolt |
| Renew after removing |
| Always tighten threaded connections in unladen position → Chapter |
| 130 Nm +180° |
| 5 - | Wheel bearing housing |
| 6 - | Bolt |
| Renew after removing |
| Always tighten threaded connections in unladen position → Chapter |
| 70 Nm +180° |
| 7 - | Nut |
| Renew after removing |
| 8 - | Spreader rivet |
| 9 - | Stone deflector |
| 10 - | Bolt |
| 8 Nm |
| 11 - | Lower transverse link |
| Removing and installing → Chapter |
| 12 - | Eccentric bolt |
| A wheel alignment check must be performed if loosened → Chapter |
| Do not turn more than 90° in either direction (i.e. from minimum to maximum adjustment position). |
| 13 - | Eccentric washer |
| Inner hole with lug |
| 14 - | Nut |
| Renew after removing |
| Always tighten threaded connections in unladen position → Chapter |
| 95 Nm |
| 15 - | Subframe |
| 16 - | Eccentric bolt |
| A wheel alignment check must be performed if loosened → Chapter |
| Do not turn more than 90° in either direction (i.e. from minimum to maximum adjustment position). |
| 17 - | Eccentric washer |
| Inner hole with lug |
| 18 - | Nut |
| Renew after removing |
| Always tighten threaded connections in unladen position → Chapter |
| 95 Nm |

 Assembly overview - transverse link, multi-link suspension, four-wheel drive
1 -
Washer
2 -
Nut
Renew after removing
3 -
Upper transverse link
Removing and instal ...
Other materials:
Removing and installing fresh air blower - V2-, RHD vehicles
Note
If only the fresh air blower -V2- is defective, remove and
install fresh air blower control unit -J126-
→ Chapter.
Removing
–
Remove baffle plate
→ Chapter.
...
Removing and installing lower transverse link
Special tools and workshop equipment
required
Torque wrench -V.A.G 1332-
Removing
–
Loosen wheel bolts.
–
...
Description of the central locking system
First read and observe the introductory information
and safety warnings The central locking system enables you to lock and unlock
all the doors, the tailgate and tank flap from one central point:
From outside the vehicle with the vehicle key .
From outside the vehicle with Keyl ...
