Volkswagen Golf Service & Repair Manual: Emptying fuel tank with fuel tank more than 3/4
full, engine code CWVA

| Special tools and workshop equipment required |
| Torque wrench -V.A.G 1332- |
| Fuel extractor -VAS 5190- |
| Fuel extractor -VAS 5190 A- for E 85 fuel (not shown). |
 Note Note
| To extract E 85 fuel, use only fuel extractor -VAS 5190 A-! |
| – |
Observe safety precautions
→ Chapter. |
| – |
Observe rules for cleanliness
→ Chapter. |
| – |
Secure earth wire of fuel extractor to a bare metal part of
the body. |
| – |
Remove right rear seat
→ General body repairs, interior; Rep. gr.72. |
|
|
|
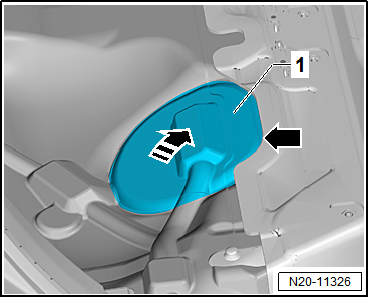
| – |
Partially detach cover -1- in
floor covering at parting line -arrow-. |
| – |
Do not detach cover completely from floor covering in order
to ensure it is reinstalled in the correct installation
position. |
| – |
Detach it just enough that the cover can be folded upwards. |
| – |
Fold up cover in -direction of arrow-. |
| – |
Remove rear bench seat
→ General body repairs, interior; Rep. gr.72. |
|
|
|
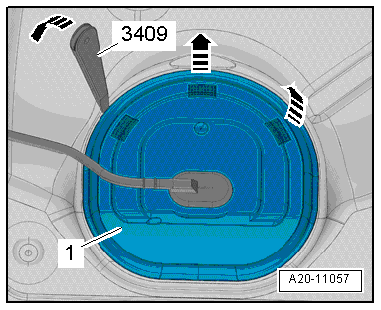
| Continuation for all vehicles: |
| – |
Unclip cover -1- for flange at
retaining tabs -arrows-, using
removal wedge -3409-. |
|
|
|
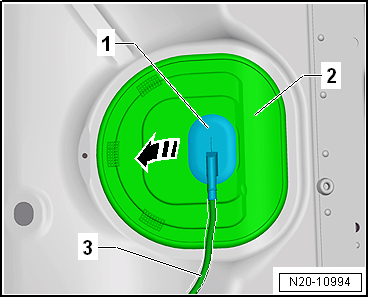
| – |
Unclip sealing grommet -1-
downwards from cover -2-. |
| – |
Push cover -2- back along
wiring harness -3-. |
|
|
|
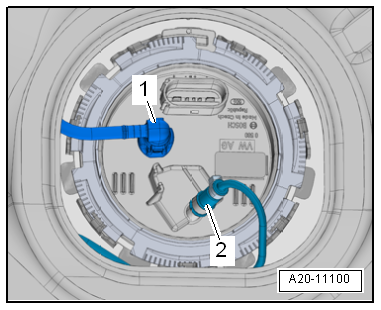
| – |
Release and pull off connector -arrow-. |
|
|

|
| – |
Disconnect fuel line -1- on
sealing flange. Separate plug-in connectors
→ Chapter. |
The fuel system is pressurised.Risk of injury due to fuel which may
spurt out.Wear eye protection.Wear protective gloves.Release pressure:
place clean cloth around connection and carefully open connection.
| – |
If fitted, remove fuel line -2-
leading to metering pump -V54- for auxiliary heater from sealing
flange. |
| – |
To do this, loosen lower hose clip. |
|
|
|
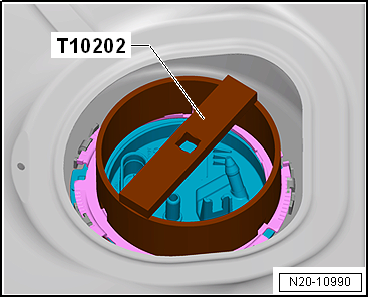
| – |
Open locking ring using wrench -T10202-. |
|
|
|
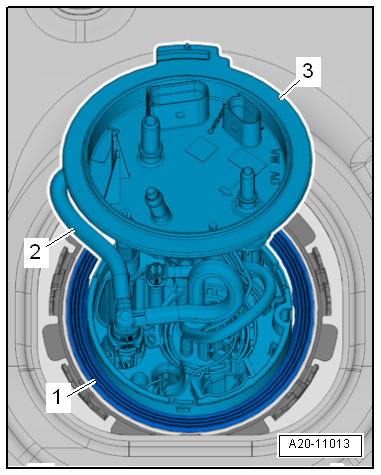
| – |
Carefully lift flange of fuel delivery unit
-3-. |
| – |
Remove gasket -1- and carefully
lift up the flange of the fuel delivery unit slightly more. |
| – |
Secure earth wire of fuel extractor to a bare metal part of
the body. |
| – |
Insert suction hose of fuel extractor -VAS 5190- as far as
possible into fuel tank. |
| – |
Extract fuel using fuel extractor -VAS 5190-. |
| If the fuel tank needs only to be emptied, reinstall fuel
delivery unit
→ Chapter. |
| → Chapter „Assembly overview - fuel delivery unit and fuel gauge
sender“ |
| → Auxiliary heater, supplementary heater; Rep. gr.82. |
|
|
 |
Special tools and workshop equipment required
Removal wedge -3409-
Wrench -T10202-
Torque wrench -V.A.G 1332-
Fuel extr ...
Special tools and workshop equipment required
Removal wedge -3409-
Special wrench -T10202-
Fuel extractor -VAS 5190A- (for E 85 fuel)
...
Other materials:
Assembly overview - speed sensor on rear axle, all-wheel drive
1 -
ABS speed sensor
Clean inside surface of hole before inserting sensor
Coat inside surface with high-temperature paste -G 052 112 A3-
Removing and installing
→ Chapter
2 -
Bolt
...
Mobile telephone preparation, Bluetooth hands-free system
Bluetooth hands-free system is integrated in control unit 1
for information electronics -J794-.
Connection to mobile telephone -R54- is established via
Bluetooth.
Aerial for Bluetooth -R152- is integrated into control un ...
Vibration, vibration control system
Using the vibration control system -VAS 6230 A- you can
perform more functions than just stationary balancing.
A special feature of this system is the testing of the
radial force of the wheel and tyre while rolling.
A ro ...
© 2016-2025 Copyright www.vwgolf.org

 Emptying fuel tank if it is less than 3/4
full
Emptying fuel tank if it is less than 3/4
full Emptying fuel tank less than 3/4
full, vehicles with four-wheel drive
Emptying fuel tank less than 3/4
full, vehicles with four-wheel drive